Tool Upload Video Youtube Hàng Loạt

Nếu bạn đang băn khoăn không biết làm cách nào để upload hàng loạt video lên các kênh Youtube. Phần mềm upload Youtube – YoutubeUploadPro sẽ là giải pháp đơn giản và nhanh nhất cho công việc này. Hãy cùng theo dõi bài viết để tìm hiểu phần mềm này nhé!

Tại Sao Cần Sử Dụng Phần Mềm Upload Youtube?

Youtube đang là thị trường tiềm năng có thể hái ra tiền. Do đó, ngày càng có nhiều bạn trẻ tìm đến Youtube. Nhưng làm video Youtube chưa bao giờ là việc dễ dàng vì có hàng tá việc cần bạn làm chưa kể bạn phải marketing Youtube… Thay vào đó, nhiều người đã tận dụng những video có sẵn, chọn lọc những video hay để thu hút người xem. Đây là phương thức kiếm tiền trên Youtube phổ biến nhất hiện nay. Bạn chỉ cần reup video của người khác thành của mình rồi kiếm tiền nhờ những lượt kích vào quảng cáo trên video.

Do đó, nếu bạn đang làm reup để kiếm tiền thì đây sẽ là phần mềm hữu ích dành cho bạn. Tool upload video Youtube – YoutubeUploadPro sẽ giúp bạn upload hàng loạt video lên Youtube mà không làm mất quá nhiều thời gian.

Youtube luôn là nơi đem đến nhiều cơ hội cho những ai dám nghĩ, dám làm!!!!

Video hướng dẫn sử dụng chi tiết Tool Upload Video Youtube

Tính Năng Nổi Bật Của Phần Mềm YoutubeUploadPro

  • Hỗ trợ tải lên kênh Youtube hàng loạt video Youtube.
  • Giả lập nhiều máy tính ảo khác nhau.
  • Chạy được nhiều luồng cùng lúc.
  • Sử dụng Dcom hay Proxy để thay đổi IP.
  • Có thể chạy hàng loạt tài khoản Email cùng lúc.
  • Tùy chỉnh thời gian nghỉ giữa các lần chạy.
  • Tự động giải mã captcha.
  • Có thể tùy chỉnh kênh để đăng video.
  • Có thể đăng cùng lúc nhiều video.

Hướng Dẫn Sử Dụng Tool Upload Video Youtube – YoutubeUploadPro

A. Đăng Nhập

Đầu tiên, nhập lần lượt tài khoản và mật khẩu đã cấp vào hộp thoại.

Sau đó, nhấn OK để đăng nhập phần mềm YoutubeUploadPro

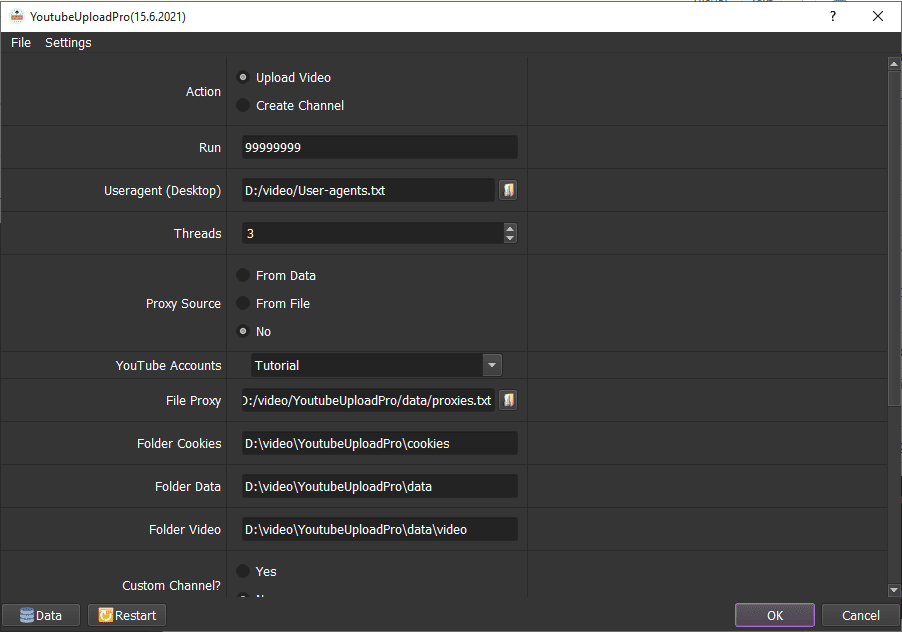
Đây là giao diện chính của phần mềm. Để cài đặt phần mềm upload Youtube bạn thực hiện như sau:

B. Hướng Dẫn Chi Tiết Phần Mềm Upload Youtube

1. Số lần chạy

Bạn có thể mặc định số lần chạy như phần mềm.

2. Trình duyệt ảo

Bạn sẽ được cấp sẵn 1 file trình duyệt ảo.

Sau đó, chọn biểu tượng để tải lên file Trình duyệt ảo như hình.

3. Số Threads

Điều chỉnh số threads theo ý muốn. Tùy vào cấu hình máy tính mạnh hay yếu mà bạn chỉnh số luồng phù hợp.

Đây là số threads tương ứng mà bạn đã cài đặt khi chạy.

4. Folder lưu trữ cookies

Để cài đặt mục này, bạn thực hiện như sau:

Tạo 1 folder Cookies như hình.


Copy đường dẫn folder dán vào mục Folder lưu trữ cookies.

5. Folder lưu data

Folder lưu data cũng thực hiện tương tự như ở mục Folder lưu trữ cookies.

6. Delay giữa các hành động (Đơn vị: mili giây)

Bạn có thể giới hạn thời gian nghỉ giữa hai lần hành động là bao nhiêu giây.

Minimum Value: Giá trị nhỏ nhất

Maximum Value: Giá trị lớn nhất

Ví dụ: Bạn muốn thời gian nghỉ giữa 2 lần chạy từ 5 đến 20 giây. Bạn thực hiện như hình.

7. Sleep

Thiết lập tương tự như ở mục Delay giữa các hành động.

8. Key 2captcha.com

Ở mục này, phần mềm sẽ tự giải mã khi bị hỏi Captcha.


9. Custom Channel: Chọn kênh

Muốn chọn kênh khi đăng video bạn chọn YES, ngược lại chọn NO.


Khi chọn Yes bạn phải thiết lập kênh bạn muốn chọn ở mục trong “data” , chọn vào biểu tượng “cây bút” và nhập tên kênh ở cột “ChannelName“. Khi chọn No ở cột “ChannelName” để trống, và phần mềm sẽ tự động lấy lệnh mặc định của tài khoản gmail.

10. Proxy Source

Có 3 sự chọn lựa để thiết lập chức năng này:

Chọn lựa 1: From Data

Nếu bạn chọn chạy bằng From data, thì trong “Data” bạn cần phải nhập thông tin vào.

Chọn lựa 2: From File

Chọn chức năng này bạn cần cung cấp file chứa IP và Port và Copy đường dẫn đến file dán vào mục “File Proxy“.

Cấu trúc file Proxy như hình, giữa IP và Port cách nhau bởi dấu phẩy.

Chọn lựa 3: No 

Bạn chọn “No” thì không cần làm như hai lựa chọn trên. Nhưng khuyến khích bạn nên chạy có Proxy nhé.

11. Will watermark

Muốn chọn chèn thêm ảnh vào video thì bạn chọn YES, ngược lại chọn NO.

Khi chọn Yes bạn phải nhập thêm tên và định dạng của ảnh vào cột “video” trong “data“.

Lưu ý: cần thiết lập một thư mục tên “video” trong thư mục “data” và lưu các video cần tải lên youtube trong đó.

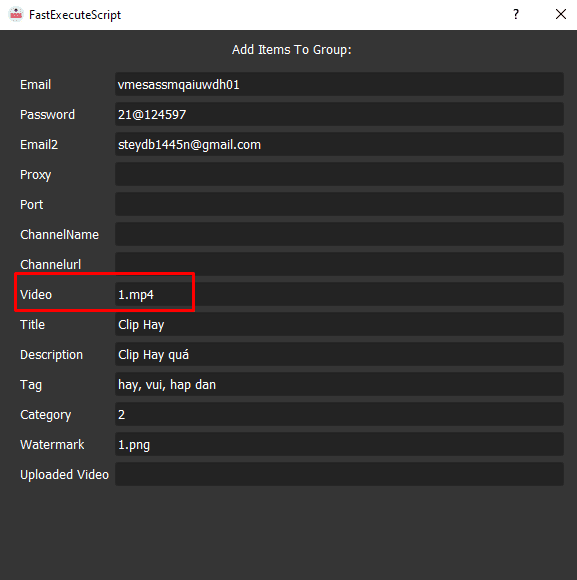
Ngoài ra bạn cần nhập thêm thông tin tên video kèm định dạng vào ô “Video” như hình bên dưới:

12. Nhập dữ liệu tài khoản vào phần mềm

Có hai cách để bạn thêm thông tin tài khoản vào phần mềm như sau:

Chọn nút DATA ở góc trái phía dưới phần mềm.

Cách 1: Chuẩn bị một file dữ liệu bằng Google sheet, cấu trúc bên trong file lần lượt nhập nội dung các cột như sau: “Tên gmail, mật khẩu, email 2, Proxy, Port, ChannelName, Channelurl, video, Title, Description, Tag, category, Watermark, Uploadedvideo”. Những nội dung nào không cần thì chúng ta “để trống” ô đó.

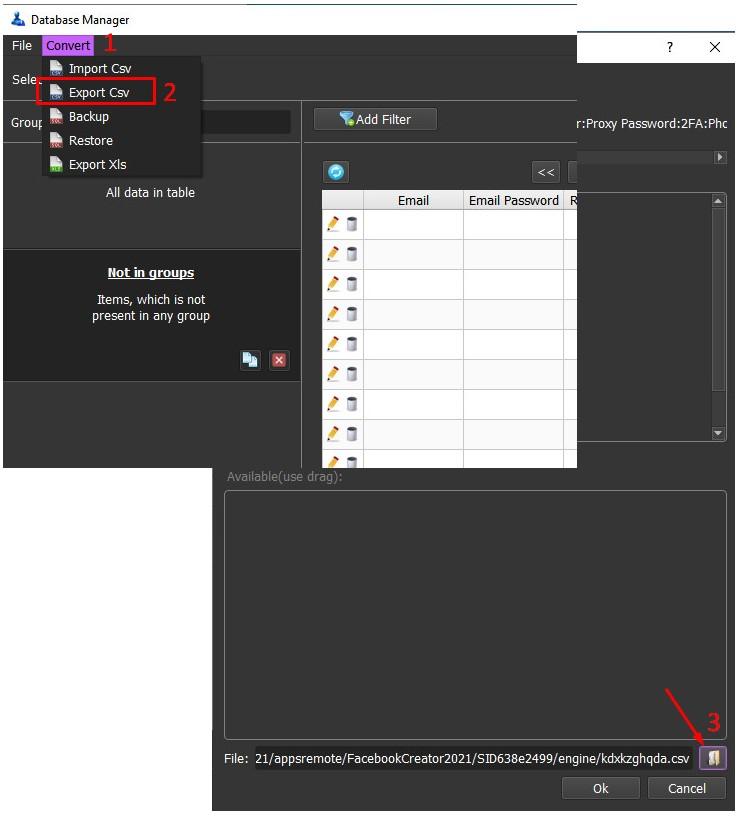
Tiếp theo, tải về với định dạng “*.csv” (như hình bên dưới).

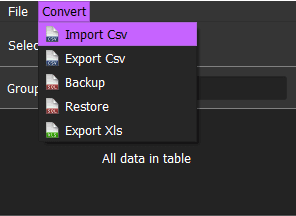
Tiếp theo chọn Convert > Import Csv.

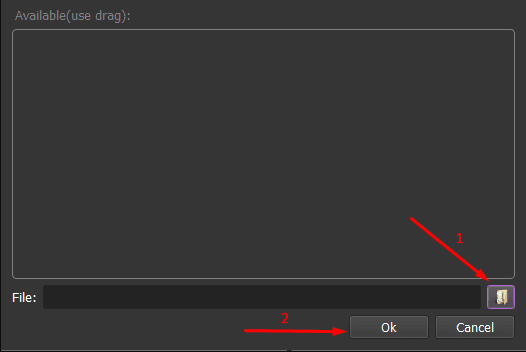
Sau đó, click vào  và chọn file dữ liệu (dạng file txt) đã lập. Nhấn OK.

phần mềm tạo backlink

Thông tin dữ liệu tải lên sẽ được lưu trong “Database Manager”.

Cách 2:

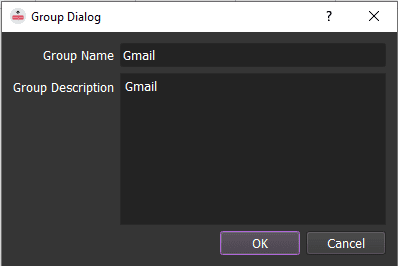
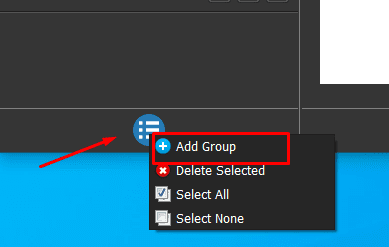
Click  bên góc trái > chọn Add Group để tạo tên nhóm.

Hộp thoại Group Dialog hiển thị và nhập thông tin nhóm như hình.

  • Group Name: Nhập tên nhóm
  • Group Description: Mô tả về nhóm

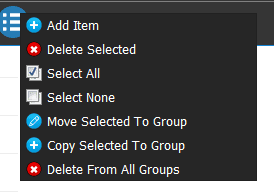
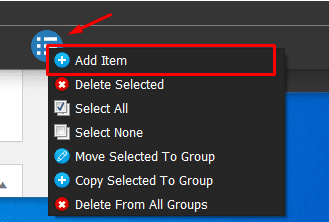
Chọn nút  bên góc phải hộp thoại > chọn Add Item.

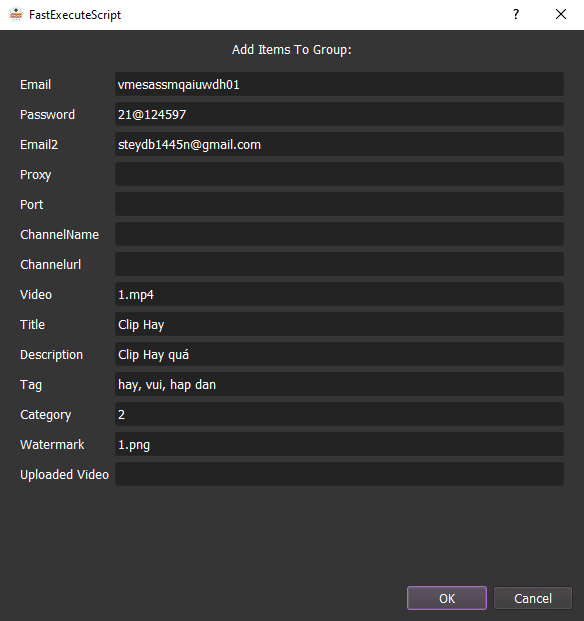
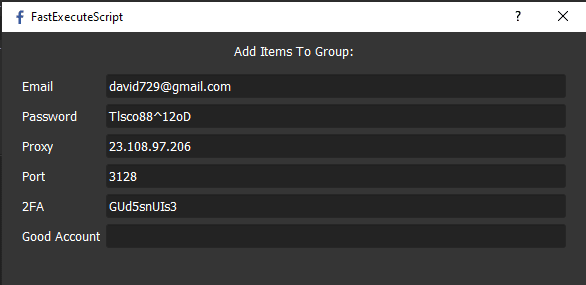
Hộp thoại FastExecuteScript xuất hiện.

Điền thông tin bao gồm: Email, Password, Email2 (nếu có), Proxy+Port (nếu có) + Channel Name + Channel Url,…  vào hộp thoại.

Nhấn OK khi hoàn thành.

Sau đó, ở hộp thoại cài đặt ban đầu, ở mục “Youtube Account” , chọn tên Gruop data bạn cần chạy.

Lưu ý:

  • ChannelurlUploadedvideo sẽ tự tạo ra trong quá trình phần mềm hoạt động.
  • Bạn có thể đổi tên file danh sách Email để dễ phân biệt.

  • Để xóa những Email không cần dùng đến, bạn thực hiện như sau:

Xóa địa chỉ email:

– Nếu muốn xem lại hoặc muốn sửa nội dung nào đó trong hộp thoại FastExecuteSpcript bạn click chọn email cần sửa, sau đó chọn  hệ thống sẽ hiện lại hộp thoại FastExecuteSpcript. Bạn sửa lại thông tin và bấm OK khi hoàn thành.

– Trong lúc cài đặt, nếu muốn xóa thông tin Email nào đó. Bạn click chuột vào email đó và nhấn, hệ thống sẽ hiển thị thông báo hỏi bạn có muốn xóa không?

Nếu muốn xóa chọn OK, ngược lại chọn CANCEL để thoát.

  • Chú thích:

HƯỚNG DẪN SỬ DỤNG PHẦN MỀM QNITUBE

Hoặc click chọn các Email không dùng nữa và chọn Delete Selected.

Hoặc nếu muốn xóa hết tất cả các Email trong một nhóm, bạn chọn Select All > Delete Selected.

Xóa nhóm:

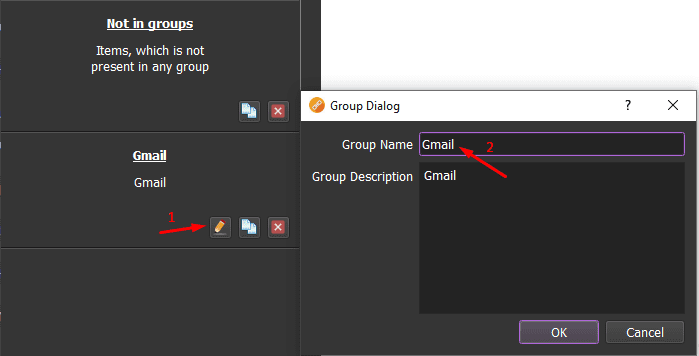
Cách làm cũng tương tự như xóa Email.

Bạn chọn ở mỗi nhóm để xóa.

Hoặc click chọn nhóm muốn xóa và chọn Delete Selected.

13. Folder Videos

Ở mục này bạn cần tạo một thư mục tên là “video” nằm bên trong thư mục “data” lấy đường dẫn đến folder chứa video.

Sau đó, dán vào mục Folder Videos

Sau khi đã kiểm tra lại các mục, bạn bấm OK để phần mềm hoạt động.

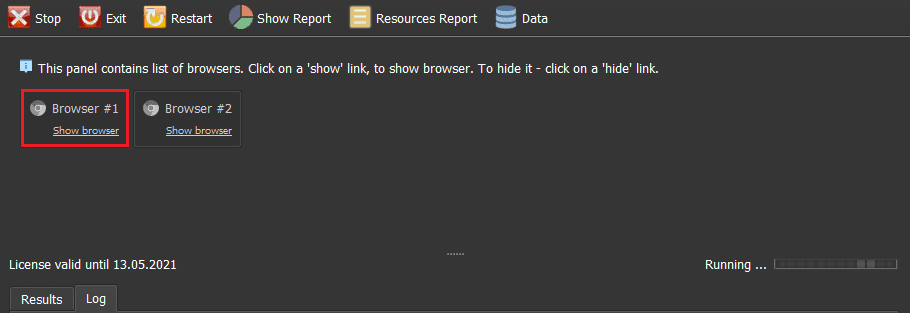
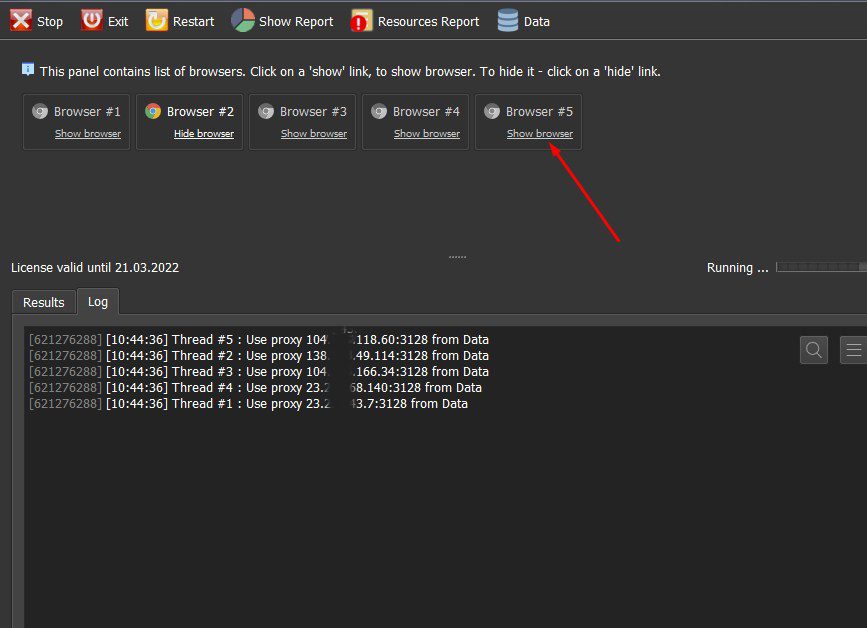
Chọn Show browser để xem quá trình chạy của phần mềm.


Mọi hoạt động của phần mềm đều được liệt kê ở mục Log. Bạn có thể biết phần mềm đang chạy đến đâu, bị lỗi ở giai đoạn nào.


Xem thêm:

Mọi thông tin chi tiết xin liên hệ:

CÔNG TY CỔ PHẦN ĐẦU TƯ VÀ CÔNG NGHỆ QNITECH

VPGD: 93 Trường Chinh, Phường Chánh Lộ, Thành Phố Quảng Ngãi

Email: admin@qnitech.vn

Tư vấn giải pháp: admin@qnitech.vn

Hotline 1: (+84) 961.461.369 – Hotline 2: (0255) 2222.089

MUA PROXY Ở ĐÂU ĐẢM BẢO TỐC ĐỘ VÀ GIÁ THÀNH PHẢI CHĂNG? THUEPROXY.VN

Mua Proxy ở đâu đảm bảo tốc độ và giá thành phải chăng là câu hỏi luôn được nhiều người quan tâm. Vậy Proxy là gì? Nên mua Proxy ở đâu uy tín? Tất cả sẽ được giải đáp trong bài viết này. Mời các bạn cùng theo dõi nhé!

PROXY LÀ GÌ? ƯU ĐIỂM CỦA PROXY 

Thực chất Proxy là một server chạy trên thiết bị phần cứng và được xem là phương tiện trung gian cho phép thực hiện kết nối gián tiếp thay vì trực tiếp như các server thật.

Bạn có thể hiểu đơn giản, khi sử dụng bằng IP truyền thống dữ liệu sẽ được trả trực tiếp về trong trình duyệt và hiển nhiên quá trình sử dụng của bạn sẽ được lưu lại trong server. Nhưng khi sử dụng bằng Proxy, đây cũng như một máy tính trên Internet với máy chủ riêng. Do đó khi bạn gửi đi một yêu cầu trình duyệt web từ máy tính của bạn nó sẽ đi đến máy chủ Proxy đầu tiên. Ở đây dữ liệu sẽ được thu thập và phản hồi từ máy chủ web rồi mới trả dữ liệu về để bạn thấy trong trình duyệt. Địa chỉ IP thực sẽ được ẩn mà thay vào đó là IP của Proxy.

So với việc dùng IP thực của máy tính để truy cập trực tiếp vào mạng thì nay người dùng lại chọn máy chủ Proxy. Vì khi sử dụng Proxy giúp bạn có thể tránh được một số hạn chế liên quan đến việc chặn và kiểm soát truy cập từ các trang web.

Ngoài ra, sử dụng Proxy là cách tốt nhất để đảm bảo truy cập web ẩn danh. Nếu địa chỉ IP của bạn bị cấm truy cập vào một số trang web nhất định thì khi sử dụng Proxy sẽ cho phép bạn vượt qua các lệnh chặn truy cập này.

MỤC ĐÍCH KHI SỬ DỤNG PROXY LÀ GÌ?

Nên mua proxy ở đâu? thueproxy.vn có uy tín hay không?

Mục đích chính của việc sử dụng Proxy là:

  • Cho phép bạn truy cập các trang web bị chặn.
  • Dễ quản lý và kiểm soát việc sử dụng Internet của nhân viên.
  • Cải thiện tốc độ và băng thông.
  • Mã hóa dữ liệu trong quá trình chuyển dữ liệu từ người gửi đến người nhận.
  • Cải thiện bảo mật vì chúng có thể chặn quyền truy cập vào các trang web độc hại.
  • Khi bạn chơi game muốn tạo nhiều acc hơn.
  • Khi bạn là SEOer cần sử dụng Proxy để đi backlink.
  • Hỗ trợ các tool marketing online.
  • Cùng với nhiều lý do khác khiến bạn muốn đổi IP.

>> Xem ngay: Mua proxy Việt Nam giá rẻ, tốc độ ổn định – Dịch vụ cho thuê proxy

MUA PROXY Ở ĐÂU ĐẢM BẢO TỐC ĐỘ VÀ GIÁ THÀNH PHẢI CHĂNG?

Hiện nay, có cả những dịch vụ dùng proxy miễn phí. Điều này phù hợp với những ai hạn chế về tài chính. Tuy nhiên vấn đề bảo mật sẽ đáng lo ngại hơn.

Khi đến với các dịch vụ proxy, bạn tốn thêm một khoản chi phí. Bù lại, độ bảo mật tốt hơn nhiều so với Proxy miễn phí.

Cho thuê Proxy tại thueproxy.vn quý khách luôn được đảm bảo:

  • Tốc độ Proxy luôn đảm bảo tốc độ tốt nhất.
  • Chúng tôi hiện đang cung cấp Proxy cố định và dân cư.
  • Không giới hạn băng thông.
  • Cài đặt nhanh gọn, bạn có thể sử dụng ngay sau khi thanh toán.
  • Giá thành rẻ nhất thị trường hiện nay.
  • Chúng tôi luôn sẵn sàng hỗ trợ bạn từ việc tư vấn, đặt mua và sử dụng.
  • Số lượng đủ đáp ứng cho nhu cầu của khách hàng.
  • Được đông đảo khách hàng khuyên dùng.

>> Có thể bạn quan tâm: Dịch vụ cho thuê proxy Việt Nam chất lượng cao tại thueproxy.vn

Để đáp ứng nhu cầu của đại đa số người dùng, thueproxy.vn đã triển khai dịch vụ proxy với chi phí rẻ nhất. Đồng thời tốc độ và băng thông luôn được tối ưu hóa để phục vụ cho nhu cầu của người dùng. Bảng giá các gói Proxy như sau:

Hiện thueproxy.vn cung cấp các loại Proxy sau:

Nếu bạn đang có thắc mắc thuê proxy ở đâu uy tín hãy liên hệ với chúng tôi ngay. Chúc bạn đọc một ngày làm việc hiệu quả và nhiều niềm vui, trân trọng cảm ơn.

Xem thêm: Kinh nghiệm dùng proxy nuôi tài khoản Facebook hiệu quả.

Increase Google Search traffic With SEOQNICLICK

QniSeoPro software is an effective SEO keywords tool which emulates different devices in various places to access your website in order to increase Google Search traffic. It interacts with the website like a real user by Searching for keywords on Google (the keywords you set up when installing) then finding your website to click on. As a result, your website will quickly increase its ranking on Google.

Main features of SEOQNICLICK BOT – Increase Google Search Traffic

  • Auto Login Gmail account and generate cookies/profiles
  • Search Google for your keywords and find your website to click
  • Unlimited keywords and websites
  • Support D-com and proxy
  • Emulate thousands of different devices
  • Multi-threads
  • Simulation of Human activities
  • Random delays
  • Auto click internal pages after visiting your website from Google Search

How to use SEOQNICLICK BOT to increase Google search traffic?

A. Login

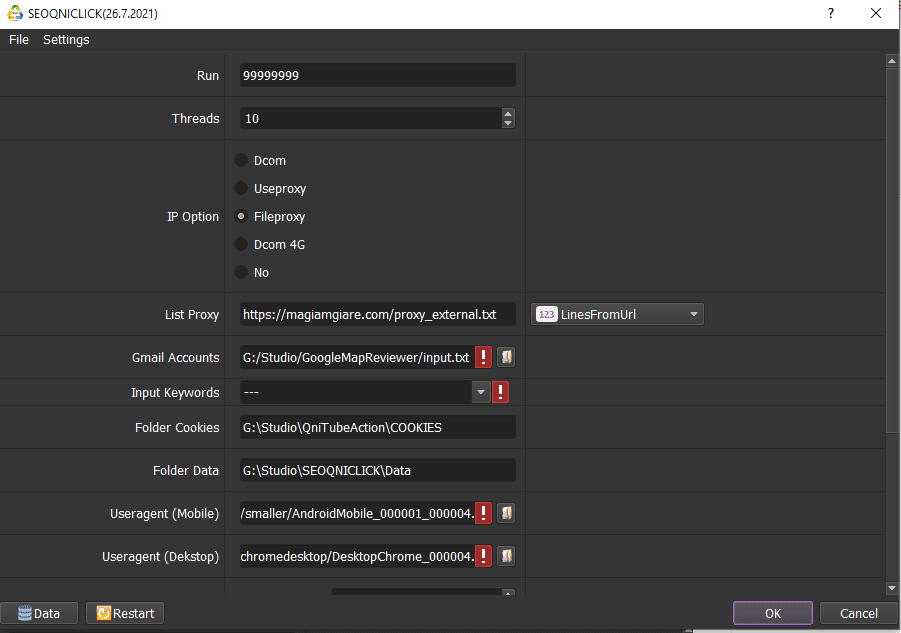
When you buy SEOQniClick software, we will provide you with 3 links: software link, desktop useragent file and mobile useragent file. Download all these files and unzip the SEOQniClick.rar then run the .exe file to open the software.

B. Detailed settings of SEOQNICLICK BOT – Increase Google Search Traffic

B1. Run

This is the number of times that you want the software to run. You can leave it as the default.

B2. Threads

The number of threads is the number of tabs, accounts, or windows that run at the same time to increase Google search traffic.

Each thread will open a separate browser which has different fingering and IP. Provide number of threads that complies with your computer configuration.

B3. Proxy/Dcom/Gmail List

To avoid being locked out of your Gmail accounts, you should use proxies.

  • Dcom: 

If you choose Dcom, create a text file (.csv format) that contains gmail accounts. Account format is “Gmail,password,recovery email”.

Select  in Gmail Account => select the text file which contains accounts and proxies.

  • Dcom 4G:

Do the same as Dcom.

  • Useproxy:

If you choose proxy with your Email account, create a text file (.csv format) that contains Gmail accounts and proxies with format: “Gmail,password,recovery email,proxy:port”.

Select  in Gmail Account => select the text file which contains accounts and proxies.

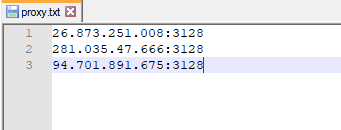
  • Fileproxy: create a text file that contains proxies. Each proxy per line in format: IP:Port:Username:Password. Leave username and password empty if your proxy doesn’t have username and password (Some proxies work with IP authentication instead of using username and password).

In List Proxy, choose LinesFromFile => Click  => select the text file that contains proxies.

Or paste the proxy address link (for LinesFromUrl section).

  • No: If you don’t have Proxy, choose No Proxy to run the software. Running so many accounts on the same IP can lead to your accounts locked.

B4. Input keywords

>>TAKE STEPS AS SHOWN IN THIS LINK HOW TO IMPORT DATA – IMPORT DATA INTO SOFTWARE (AUTOBOTSOFT.COM)

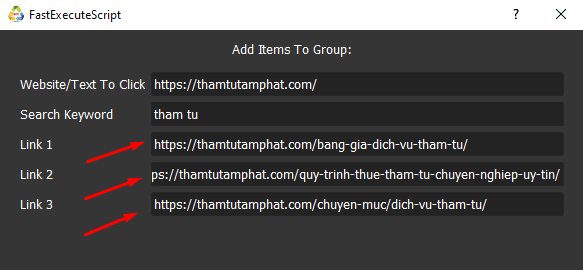
Note: Data imported consists of Website/Text To Click, Search Keyword, Link 1, Link 2, Link 3.

Step 3: Select the group that you want to SEO keywords at “Input Keywords“.

Note:

– If you want to view or edit something in the FastExecuteScript dialog box, click on the group that you want to edit. Select   and the system will display the FastExecuteScript  dialog again.

Correct the information and click OK.

– During installation, if you want to delete website information, click on that website and press .
The system will display a message asking if you want to delete it. If you want to delete, select OK, otherwise choose CANCEL to exit.

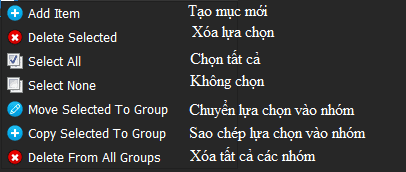
– If there are many unused groups, click on them and select Delete Selected.

Delete group:

The method is similar to deleting Website.

You select  in each group to delete.

Or click on the group you want to delete and select Delete Selected.

B5. Folder Cookies

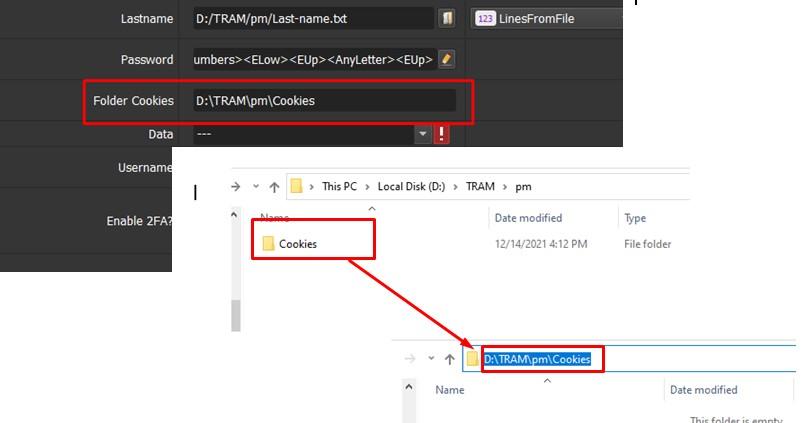
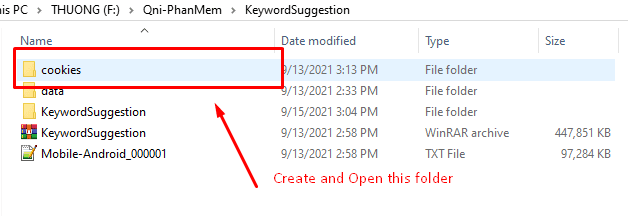
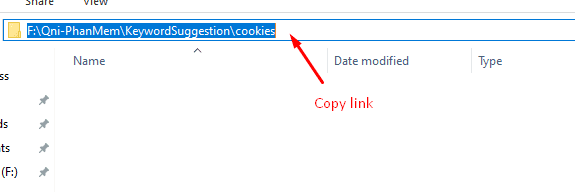
Folder Cookies is a place where the software will store cookies and profiles of the accounts. Software will use cookies and profiles for the next runs without logging back into accounts. Create a new Cookies folder on any hardware disk that you want to save cookies and profile and get the path to put into the setting as shown:

B6. Folder Data

Do the same as Folder cookies.

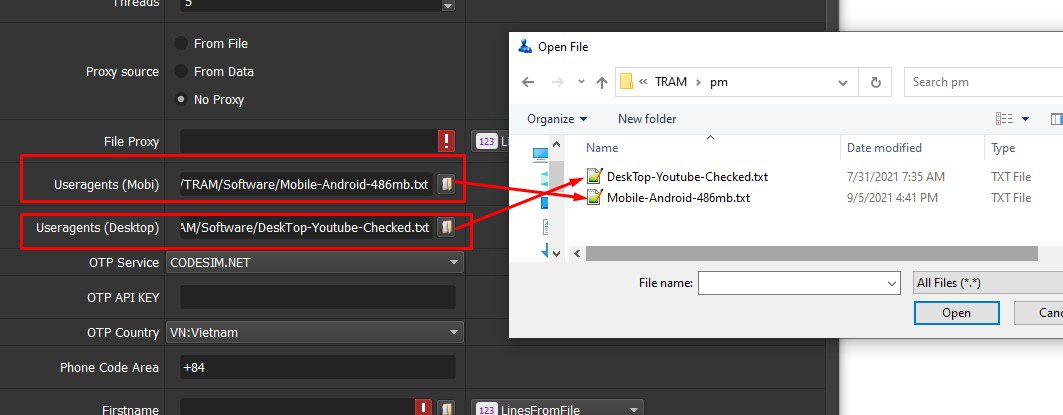
B7. UserAgents (Mobile)

Click on  ==> select the useragent files (mobile) that were downloaded as mentioned in Section A.

B8. User-Agents (Dekstop)

Do the same as UserAgents (Mobile).

B9. Internal Click

Customize the time interval between each click and interact with the website like a real user (Unit is second).

B10. Key 2captcha.com

The software will automatically decode google recaptcha.

B11. Pause Between Internal Pages

The random delay between actions (unit is millisecond).

Take the same steps as those of Internal Click function.

The last 000 is the system default.

Example: If you want the rest time between 2 runs from 1 minute to 1 minute 30 seconds, do as picture:

B12. Dcom 4G Password

If you choose Dcom 4G in IP Option, enter Dcom’s password here:

C. Run the software

Click OK to run the increase Google search traffic software.
Select Show browser to see the running of the software.

All software activities are listed in the Log section.

Tool SEO Từ Khóa

Thank you for following the article, hope it will be useful for you!

Contact info

Email: autobotsoft@gmail.com

FaceBook: https://www.facebook.com/autobotsoftsupport

Skype: live:.cid.78c51cd4e7238ae3

YouTube: https://www.youtube.com/channel/UCGftS8E3vX7IaUwg4GgDWDQ

Twitter: https://twitter.com/autobotsoft

How To Use QniGram Bot – Auto Follow/Unfollow – Auto Post And Message on Instagram

QniGram Software support users automatically perform most functions of Instagram such as auto post on Instagram, auto change name/ avatar, auto update bio/ photo, ect. This help users save time in managing a large number of Instagram accounts.

A. MAIN FUNCTIONS OF QNIGRAM SOFTWARE – AUTO POST ON INSTAGRAM

  • Check login
  • Change avatar
  • Change name
  • Update bio
  • Update Website
  • Upload photo
  • Upload photo with watermark
  • Scrape users
  • Auto Follow Users
  • Auto search and Follow Users
  • Increase follow
  • Unfollow Users
  • Like user’s photo
  • Like post
  • Watch video
  • Auto comment
  • Increase comment
  • Auto Message
  • Multi-threads
  • Support using Dcom or Proxies to change IP easily

B. HOW TO DOWLOAD QNIGRAM SOFTWARE – AUTO POST ON INSTAGRAM?

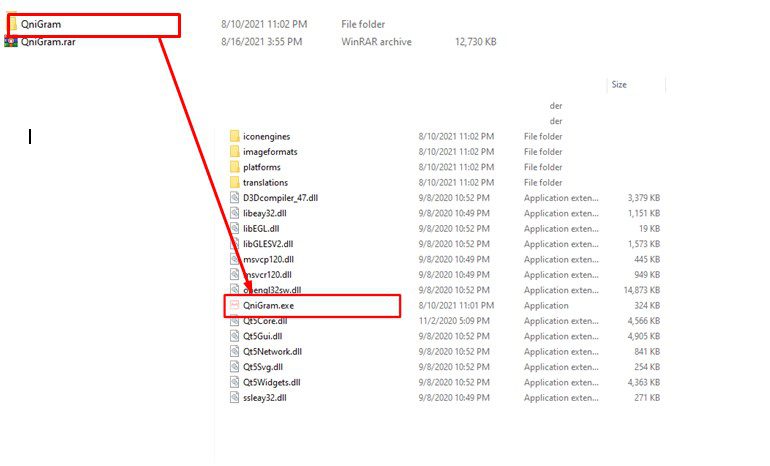
When you buy QniGram software, we will provide you with 3 links, consisting of software link, desktop useragent file and mobile useragent file. Download all these files and unzip the Qnigram.rar then run the .exe file to open the software.

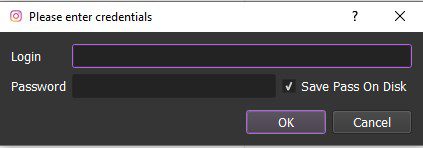
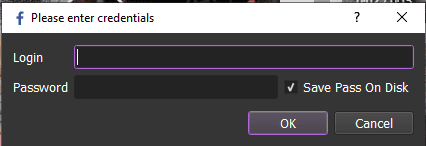
Use the provided license username and password to fill in Login and Password.

Click OK to login.

Nhập tên đăng nhập của phần mềm Instagram - Qnigram

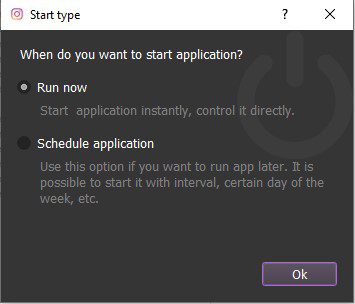
You choose one of two ways:

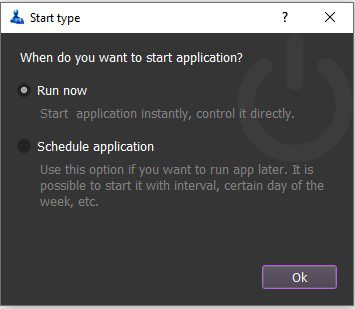
  • Run now: Run the software instantly
  • Schedule: Schedule the application to run at specific time
Giao diện của phần mềm Instagram - QniGram

Learn more: How to use Schedule Tool.

C. BASIC SETTING OF QNIGRAM – AUTO POST ON INSTAGRAM

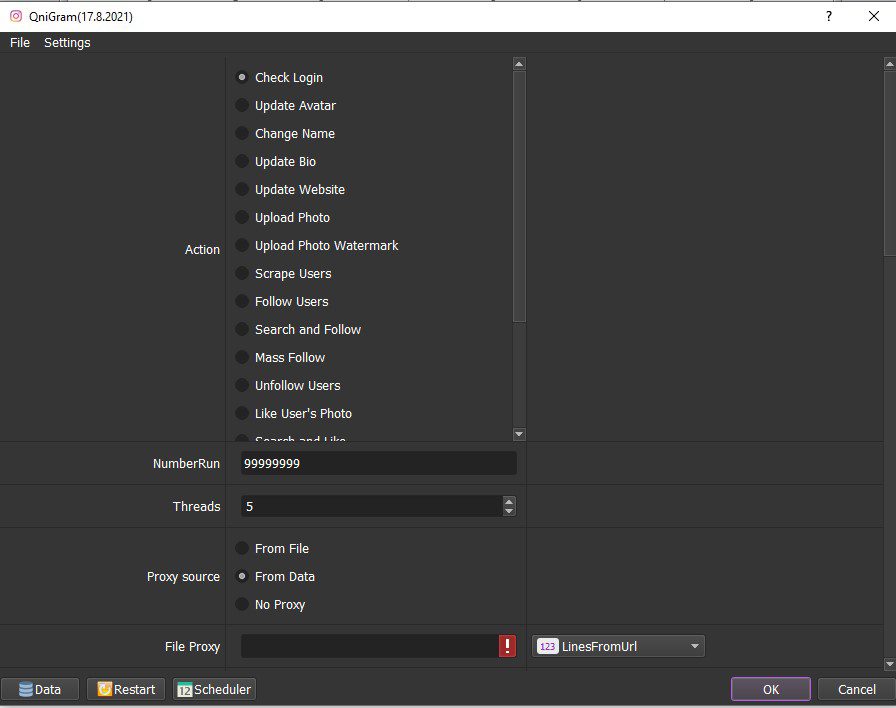
The following screenshot will show you all parameters of QniGram software:

Giao diện của phần mềm Instagram - QniGram

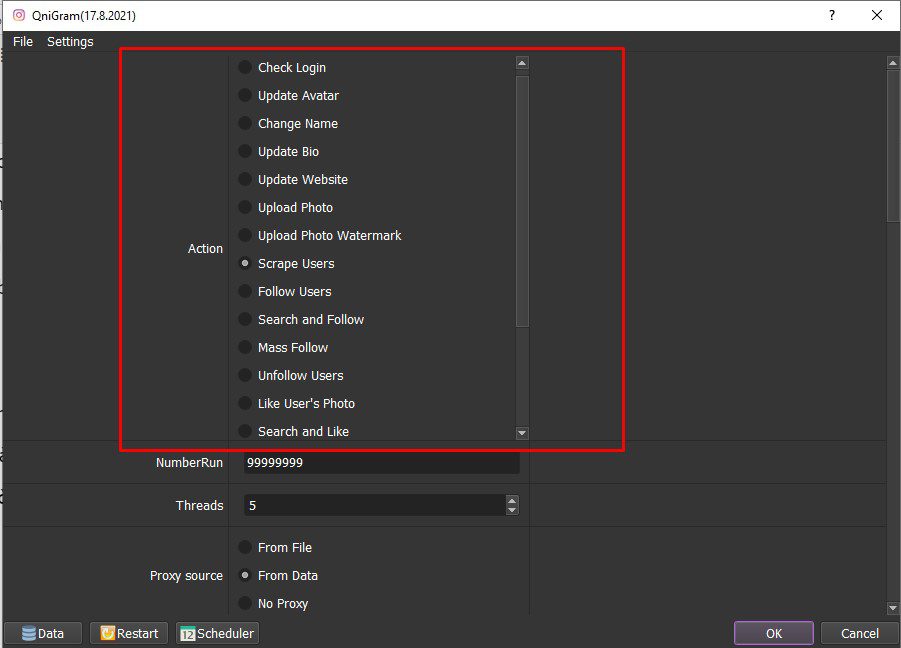
C1. Action

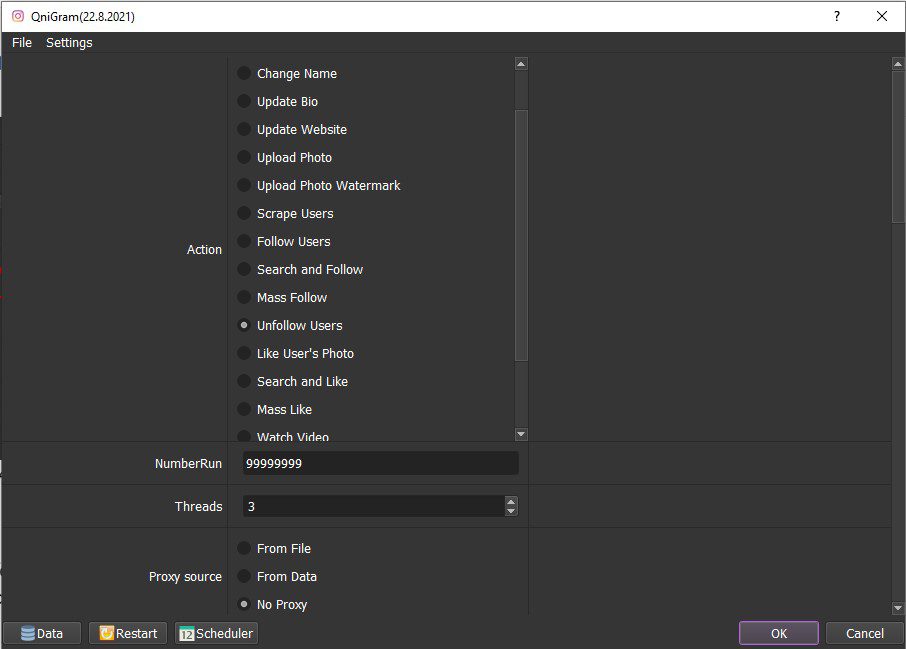
Select a function that you want to run.

QniGram Software

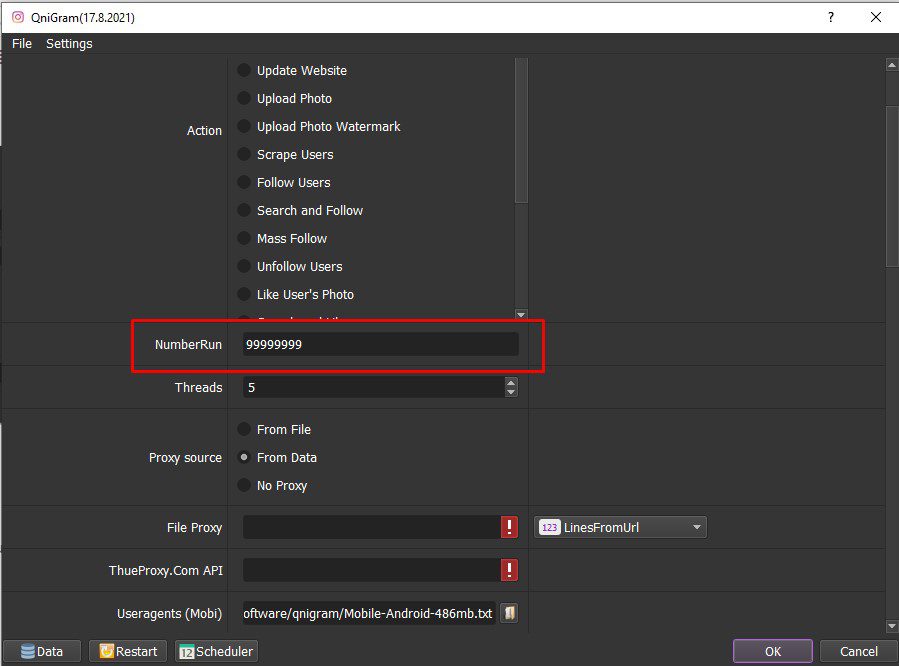
C2. Run

This is the number of times that you want the software to run. You can leave it as the default.

C3. Threads

The number of threads is the number of tabs, accounts, or windows that run at the same time.

Each thread will open a separate browser which has different fingering and IP.  Provide number of threads that complies with your computer configuration.

Instagram

C4. Proxy Source

To avoid being locked out of your Instagram accounts, you should use proxies.

  • If you choose From File, create a text file in which you will put the proxies one per line (for the LinesFromFile section), or paste the proxy address link (for LinesFromUrl section). Proxy format is IP:Port:Username:Password. Leave username and password empty if your proxy doesn’t have username and password ( Some proxies work with IP authentication instead of using username and password).

Chọn Proxy từ file - Phần mềm Instagram

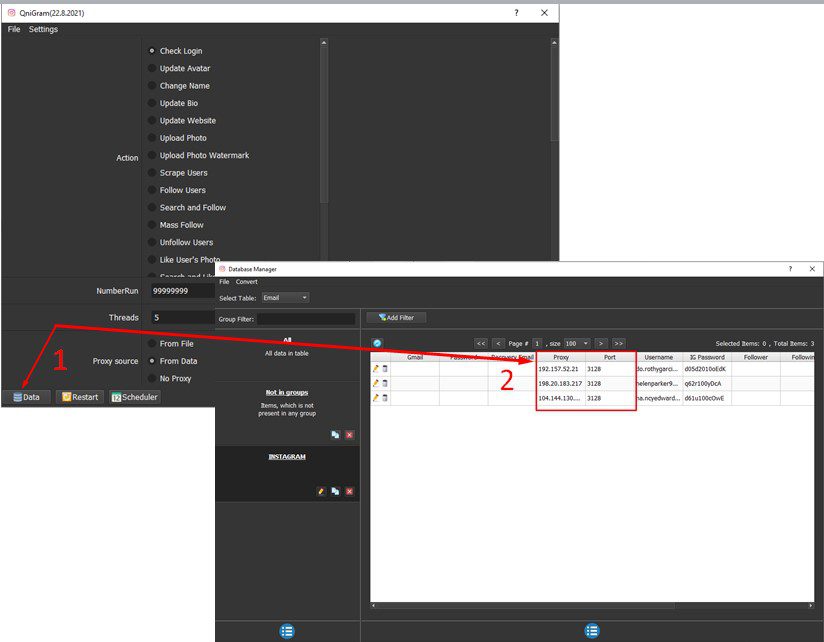
  • If you choose From Data, click Data in the lower left corner of the software. The account management panel will display (Refer to the C8. Data section to know how to import the Proxy into the software).

Chọn Proxy từ Data -Phần mềm Instagram

  • If you don’t have Proxy, choose No Proxy to run the software. Running too many Instagram accounts on the same IP can lead to your accounts locked.

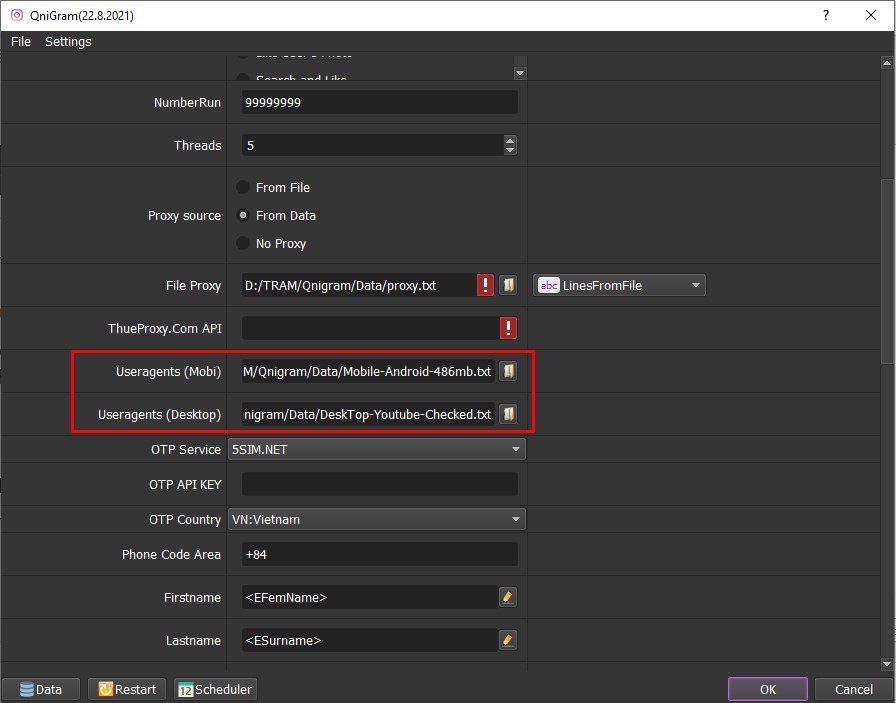
C5. Useragent (Mobi & Desktop)

Click on  => select the useragent files that were downloaded as mentioned in Section B.

Trình duyệt ảo phần mềm Qnigam

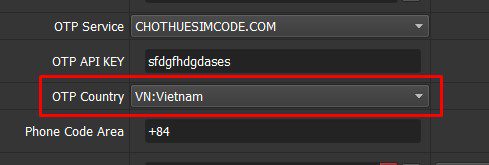
C6. OTP Service; OTP API Key and OTP Country; Phone Code Area

When you log into Instagram accounts with different IPs and virtual devices, some accounts are asked for phone verification. Autobotsoft integrated some OTP Services so that the software can auto rent phone and get verifcation code automatically. You only need to register an account at one of these OTP providers.

OTP API Key: When you register an account at an OTP website, you will have an API key. Get that API key and put into this field. QniGram bot will auto rent phone numbers and get verification codes.

OTP Country & Phone Code Area: This field is only applied to 5sim.net. Select the Country that you want to rent phone number and put phone code area of that country into this field.

C7. Folder Cookies & Folder Data

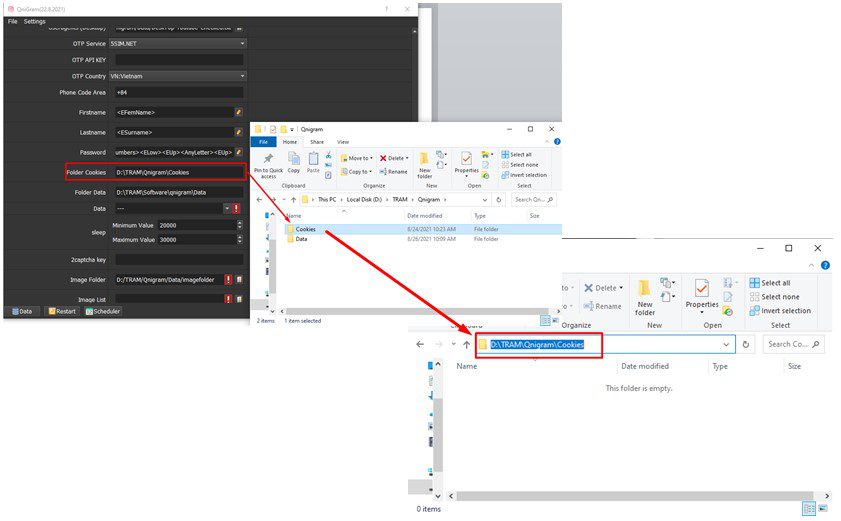
Folder Cookies is a place where the software will store cookies and profiles of the accounts. Software will use cookies and profiles for the next runs without logging back into accounts. Create a new Cookies folder on any hardware disk that you want to save cookies and profile and get the path to put into the setting as shown:

Copy link đường dẫn của Folder Cookies dán vào trong phần mềm

Do the same with Folder Data.

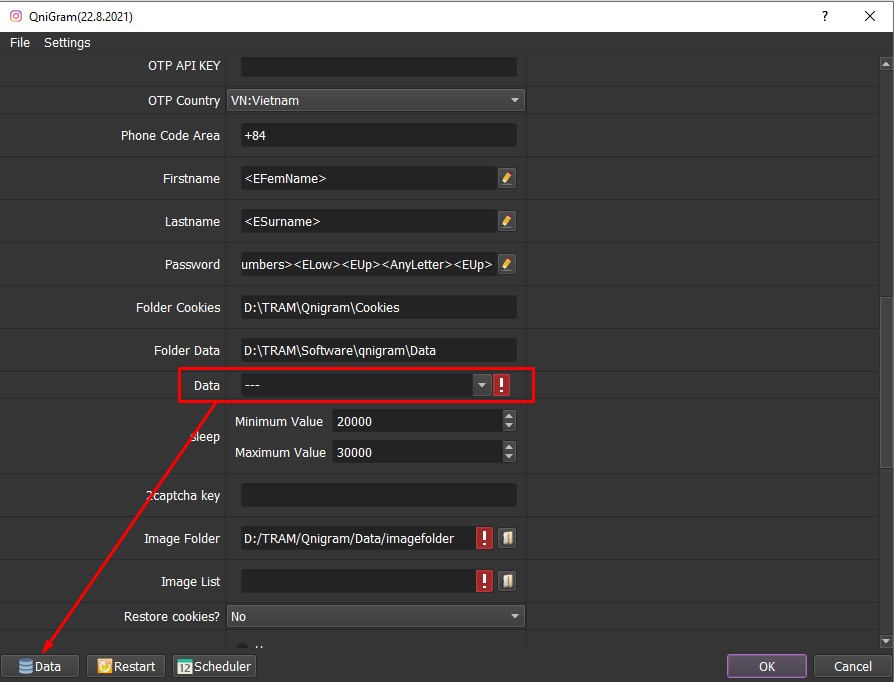
C8. Data

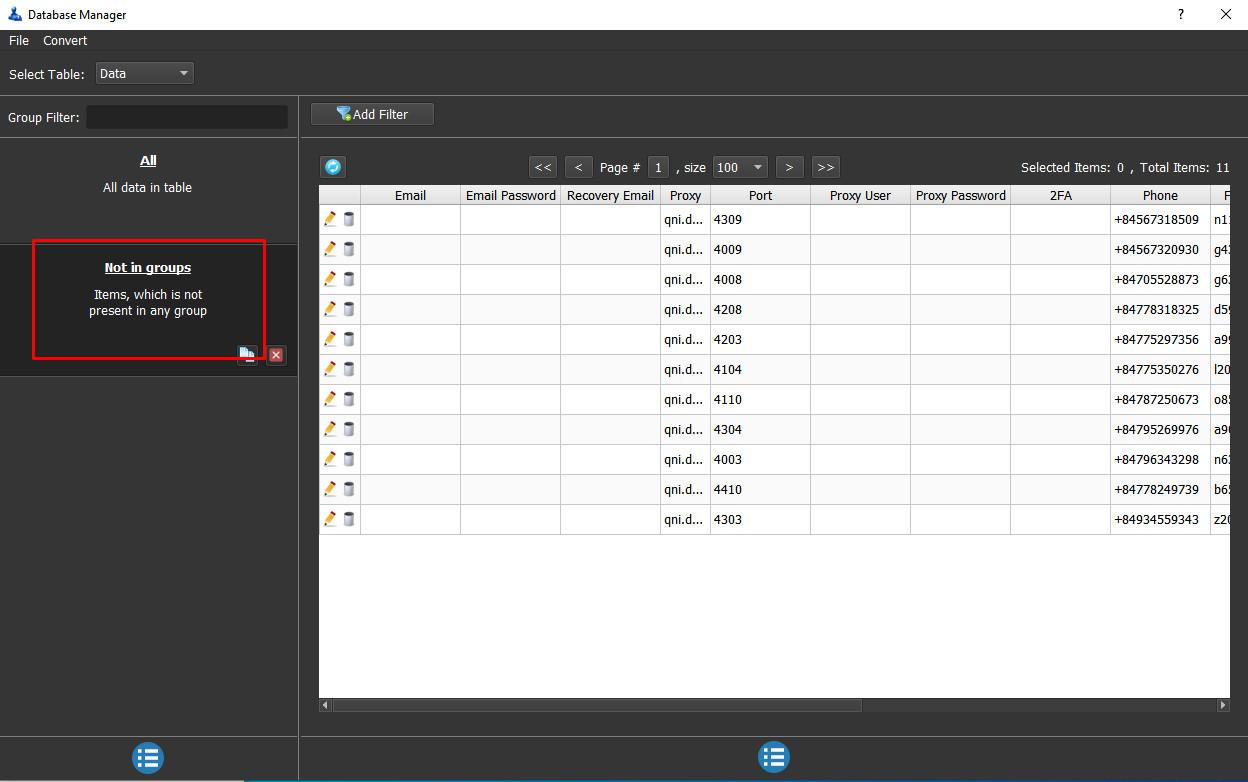
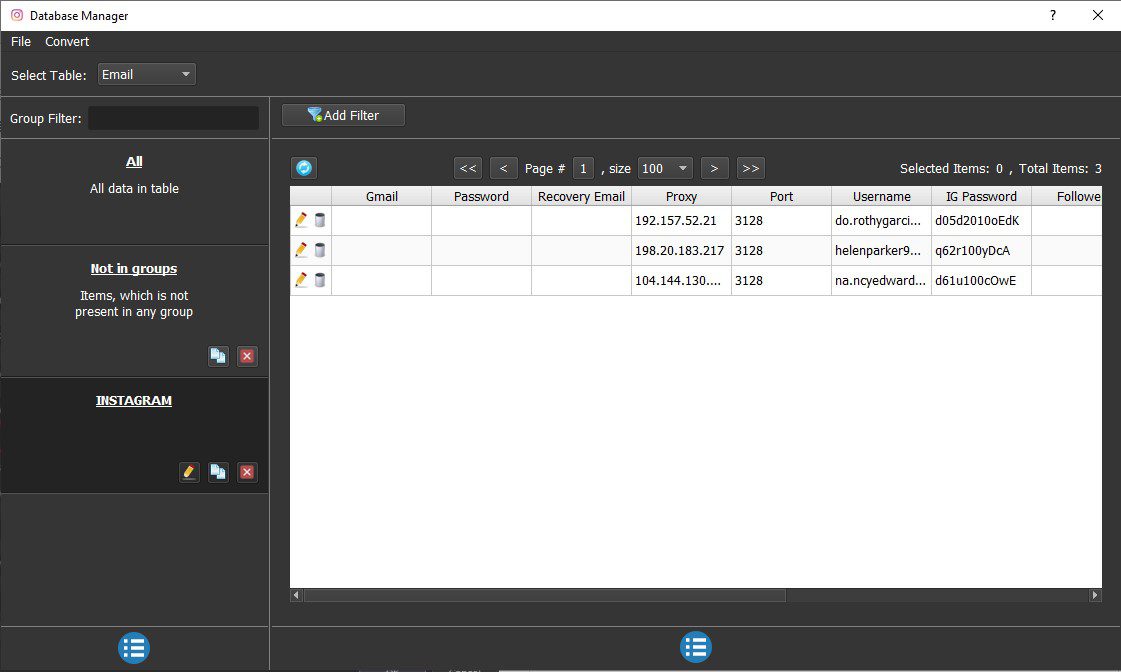
Click Data in the left corner of the screen to import Instagram accounts. The software will display the  Database Management dialog box as shown.

Mục chứa các tài khoản Instagram

If Instagram accounts are created by InstagramCreator software of autobotsoft.com, they will be linked to QniGram software and will be saved in the “Not in group” folder.

Bảng quản lý tài khoản của phần mềm Instagram

You can move accounts to other groups, by:

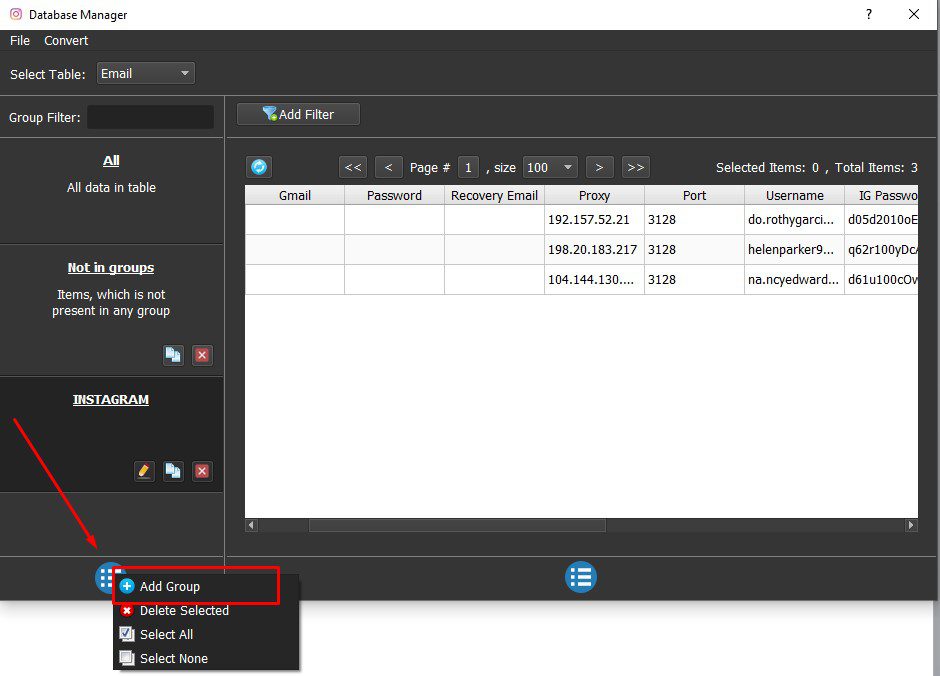
Step 1: Create a group to manage your account, click  in the left corner of the Database Management dialog box ==> Add Group ==> Set the group name.

Tạo nhóm để quản lý tài khoản Instagram

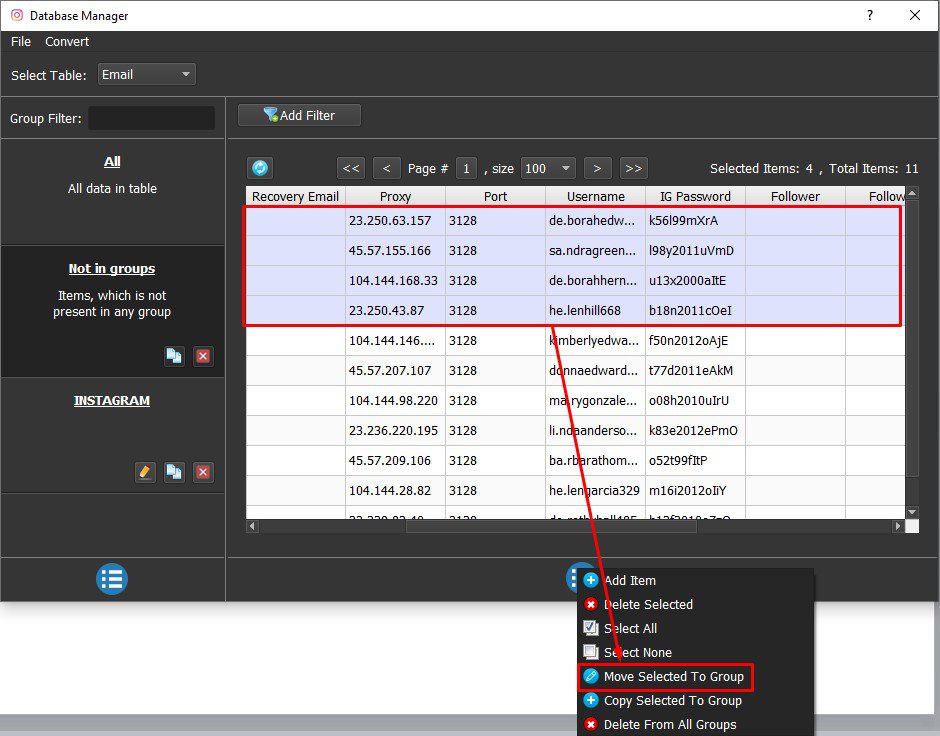
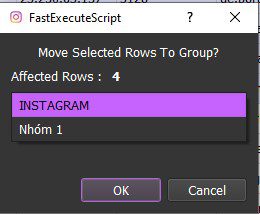
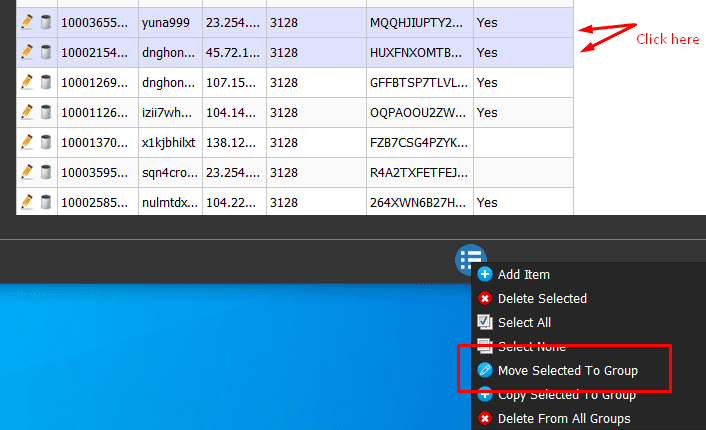
Step 2: select the accounts to move==> click  ==> Move selected to group ==> Select the group to move ==> OK.

Chuyển các tài khoản Instagram sang các nhóm khác - Phần mềm Instagram

Chọn nhóm cần chuyển các tài khoản

  • AUTO POST ON INSTAGRAM ACCOUNTS FROM OTHER SOURCES

If you use Instagram accounts from other sources. Please take steps as shown in this link HOW TO IMPORT DATA – IMPORT DATA INTO SOFTWARE (autobotsoft.com)

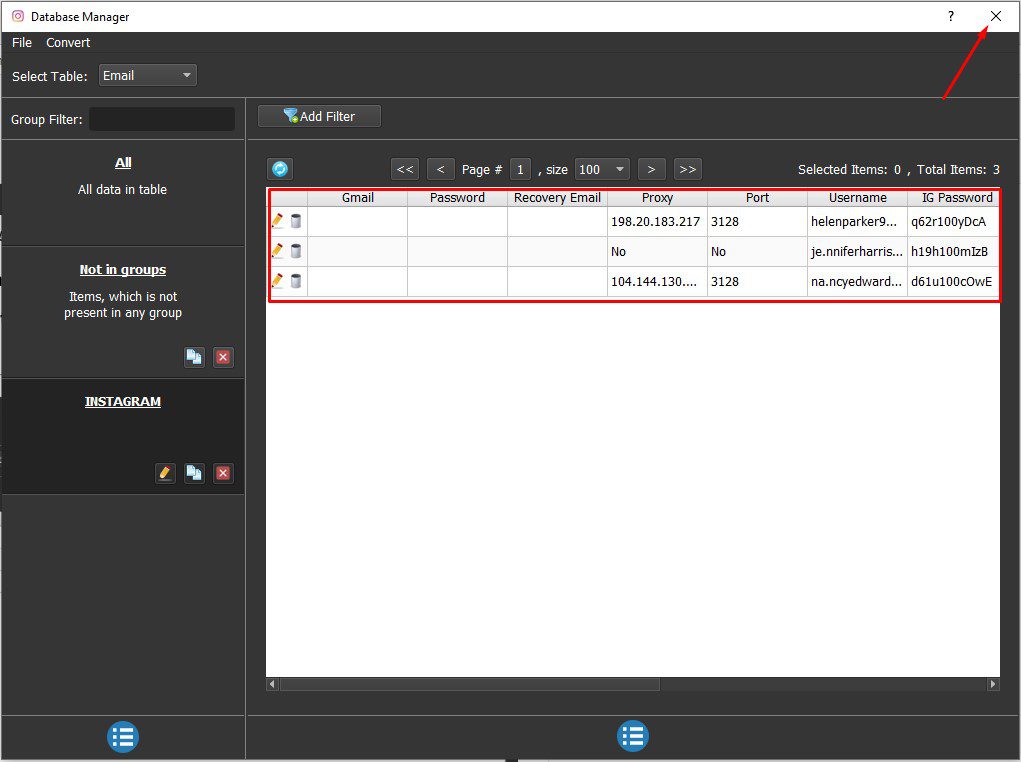
Step 3: Turn off the account management panel

After entering the accounts, the accounts will be shown as picture below. Turn off the account management panel to return to the software.

Tắt bảng quản lý tài khoản

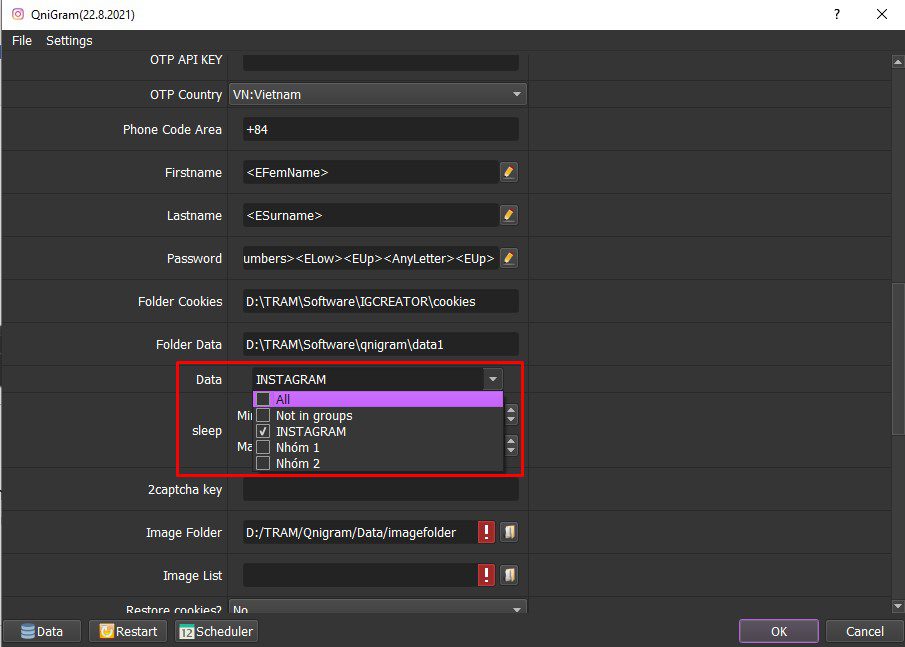
Step 4: Select the account group to run

In the Data section, select the group of Instagram accounts to run.

Note: You can select multiple groups to run at the same time.

Chọn nhóm tài khoản Instagram cần chạy

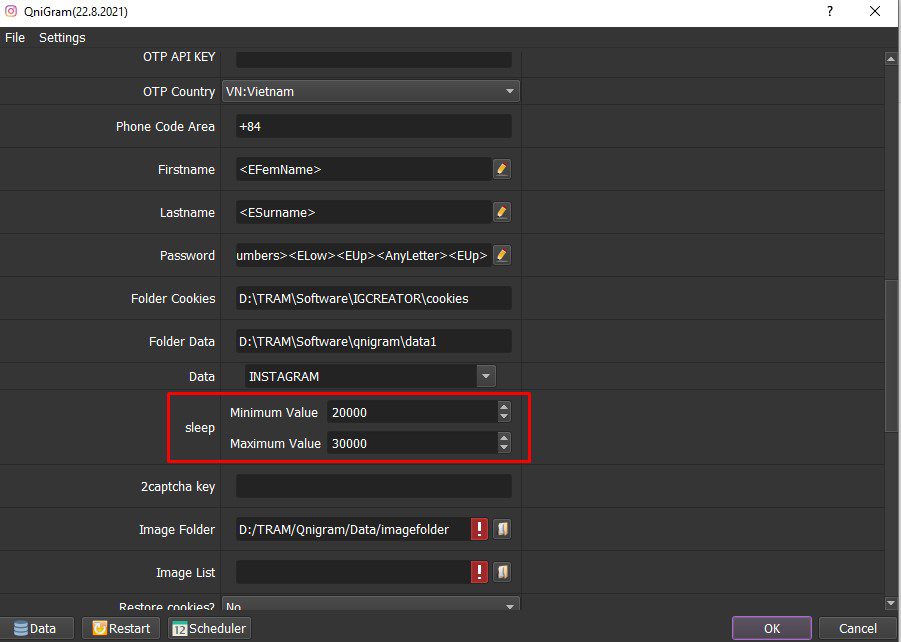
C9. Sleep

Sleep is time to wait between two actions.

Note: Unit is millisecond (30000 = 30 seconds)

Thời gian nghỉ giữa các luồng chạy - Phần mềm Qnigram - Phần mềm Instagram

C10. 2Captcha Key

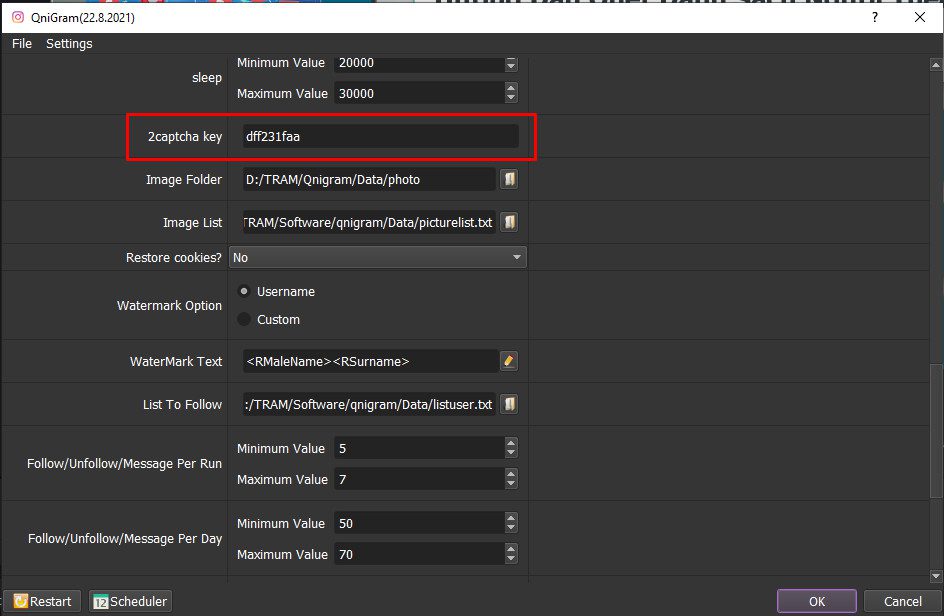
As mentioned in the OTP Service section, when you log in, the Instagram app will ask for a captcha verification in some cases. Therefore, you need to create an account at 2captcha.com, then copy and paste the code in the 2captcha key section. the software will automatically decode the captcha when you log in.

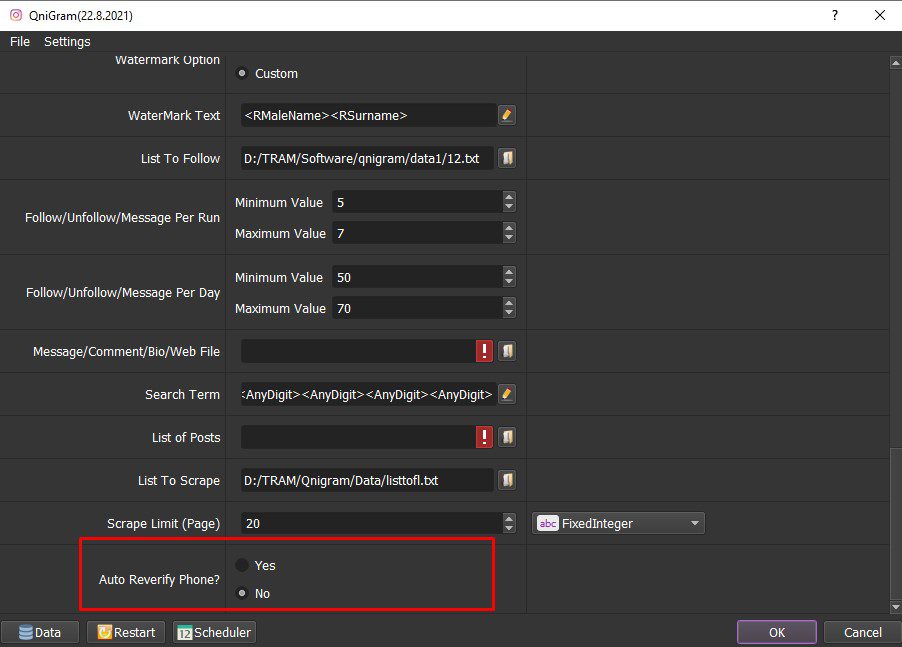
C11. Auto Reverify Phone

This function will automatically verify the phone number when you log in.

If you choose “Yes“, the software will get phone number and verification code from OTP website to verify Instagram accounts automatically. Conversely, if you choose “No“, when the account needs to be verified, the software will automatically ignore that account.

Tự động xác minh số điện thoại - Phần mềm Qnigram - Phần mềm Instagram


D. HOW TO RUN EACH FUNCTION QNIGRAM – AUTO POST ON INSTAGRAM

D1. Check Login

This function is used to check Instagram accounts before performing auto post on Instagram.

In the Action section, select Check Login -> Data (refer to Section 8, Part I) -> select the groups of accounts need to be checked ==> click “OK” to run.

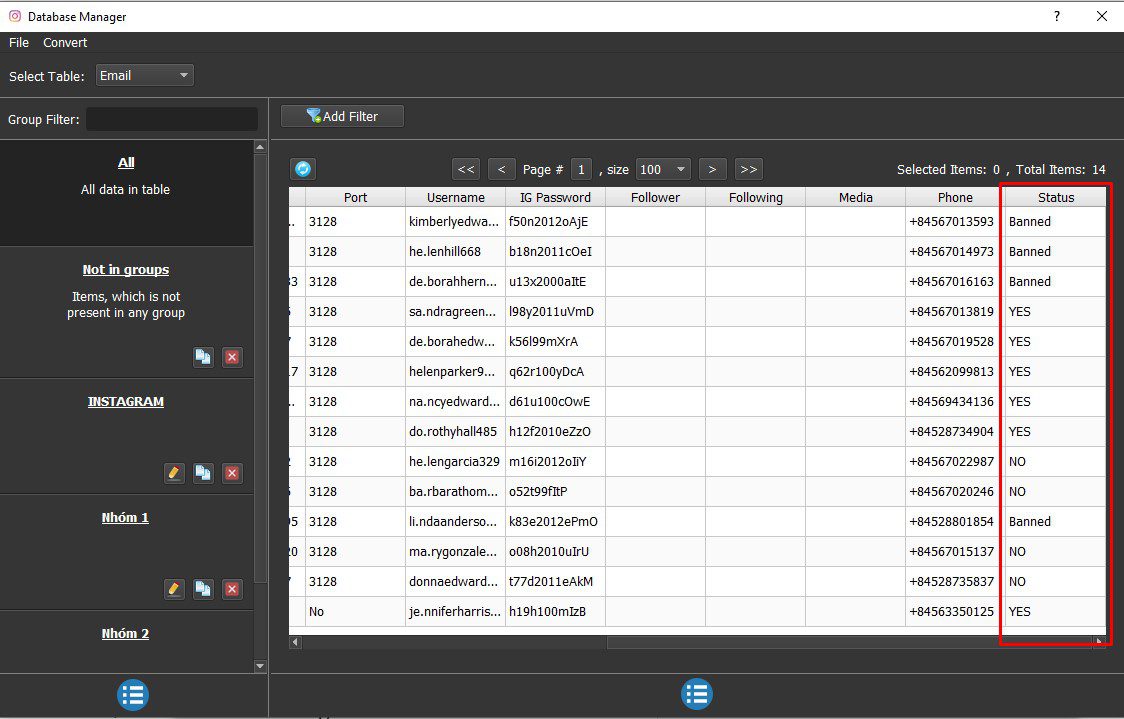
After running, go to the account management panel -> See the “Status” section to know the status of each account.

Chạy chức năng check login - Phần mềm Qnigram - Phần mềm Instagram

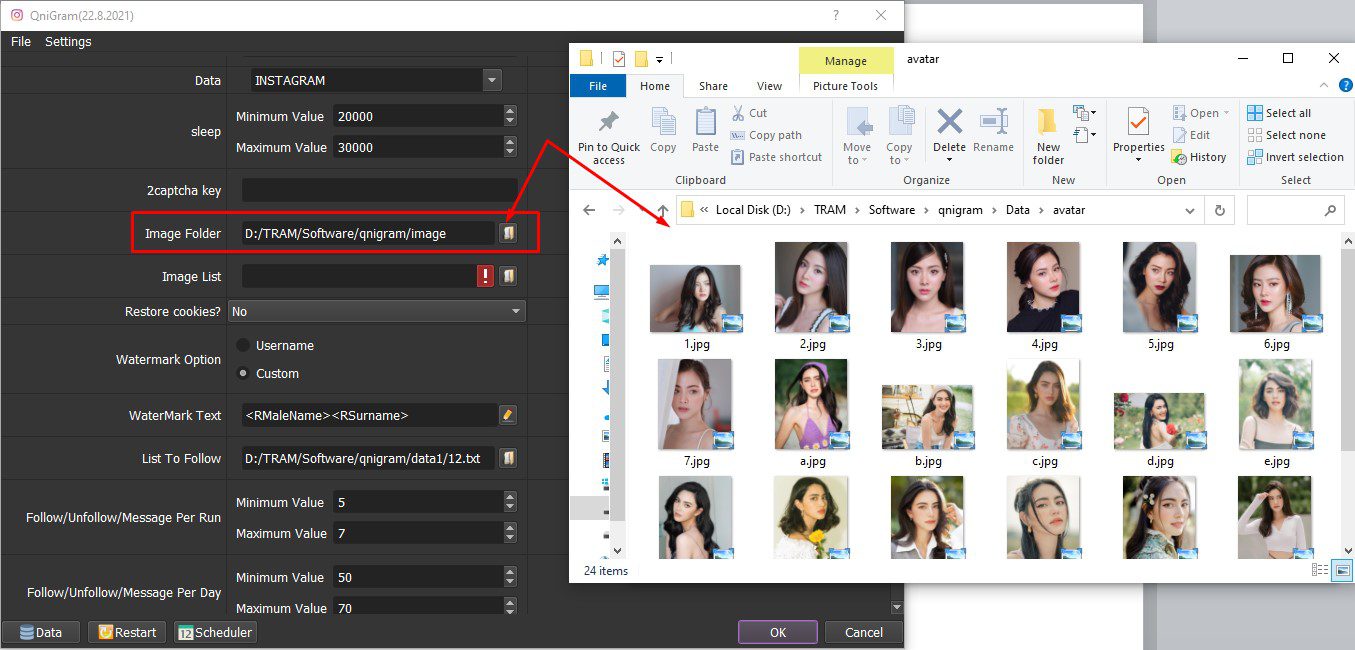
D2. Update Avatar

Update Avatar is used to update avatars for Instagram accounts.
In the Action section, select Update Avatar.

In the Image Folder section, click on  ==> select the folder containing the images that will be used for avatars ==> Click “OK” to run.

Cập nhật Avatar - Phần mềm Qnigram - Phần mềm Instagram

D3. Change Name

You will perform this function in case you want to change the name of Instagram accounts.

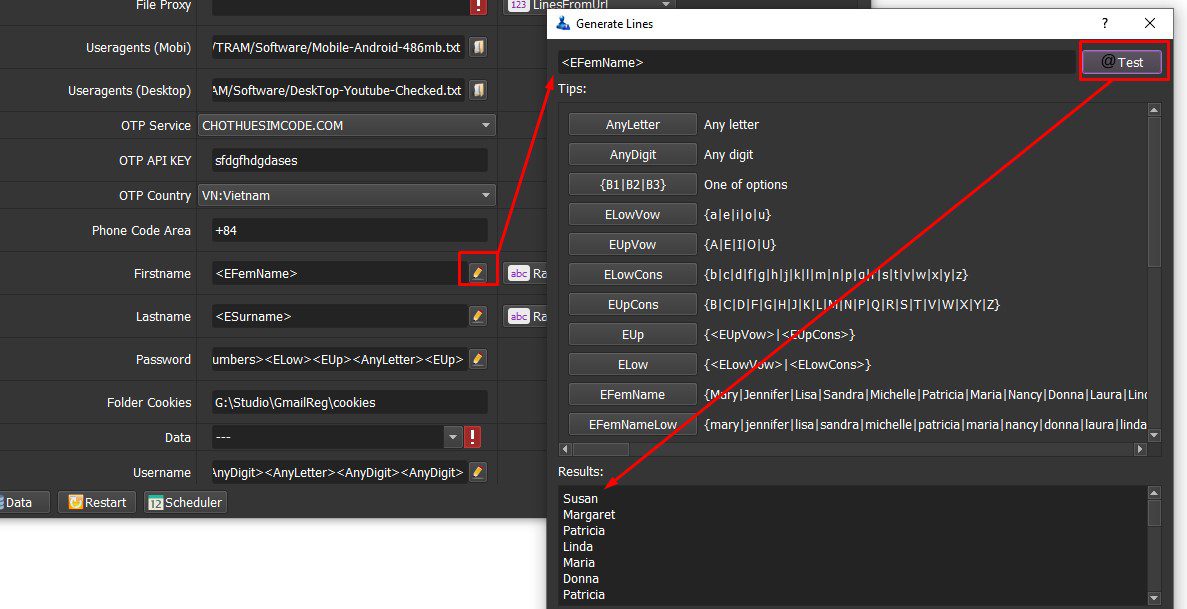
In the Action section, select Change name. Click sửa-1.png (22×30) in the First Name and Last name section to define the name that you want to change. You can use Spintax format or you can select predefined Tips as shown in the following screenshot:

Thay đổi tên cho các tài khoản Instagram

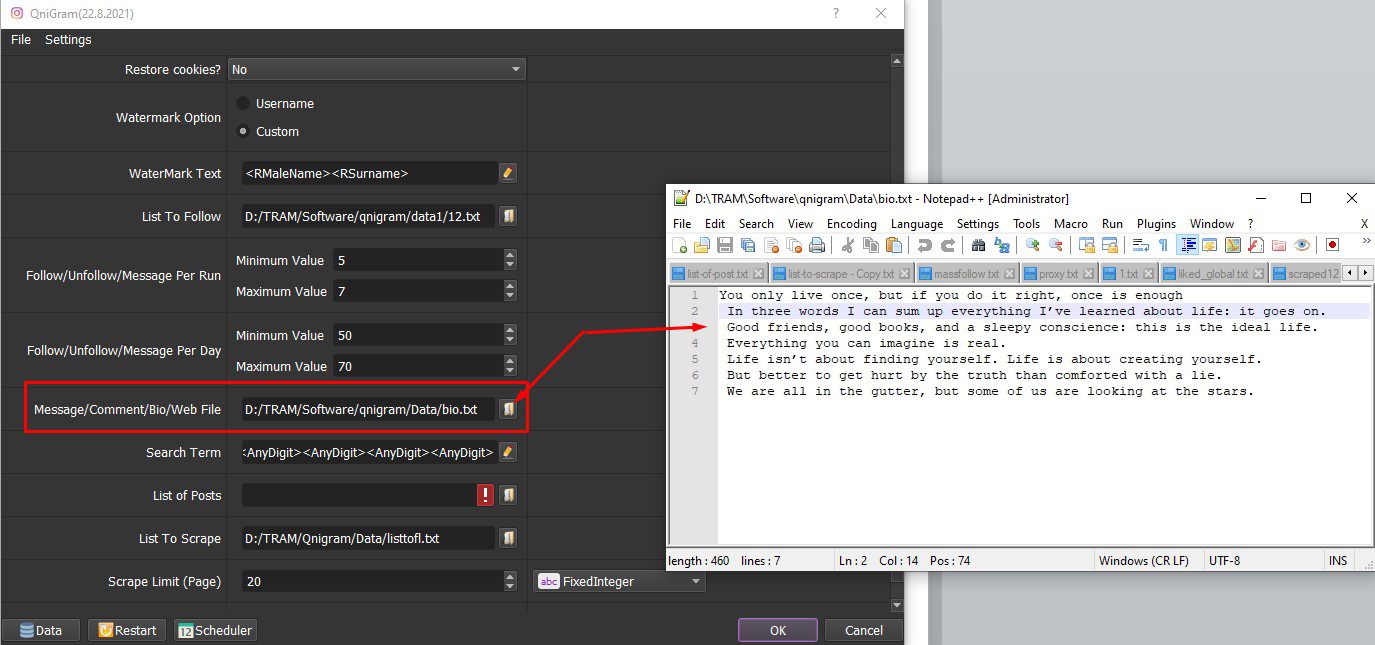
D4. Update Bio

This is a profile update function for Instagram accounts.
In the Action section, select Update Bio. Next, you create a text file to save the Bio you want to change. Software will use random line from this text file as BIO.

In the Message/Comment/Bio/Website section, click  on the bio file you just created ==> click Ok to run.

Cập nhật Bio - Phần mềm Qnigram - Phần mềm Instagram

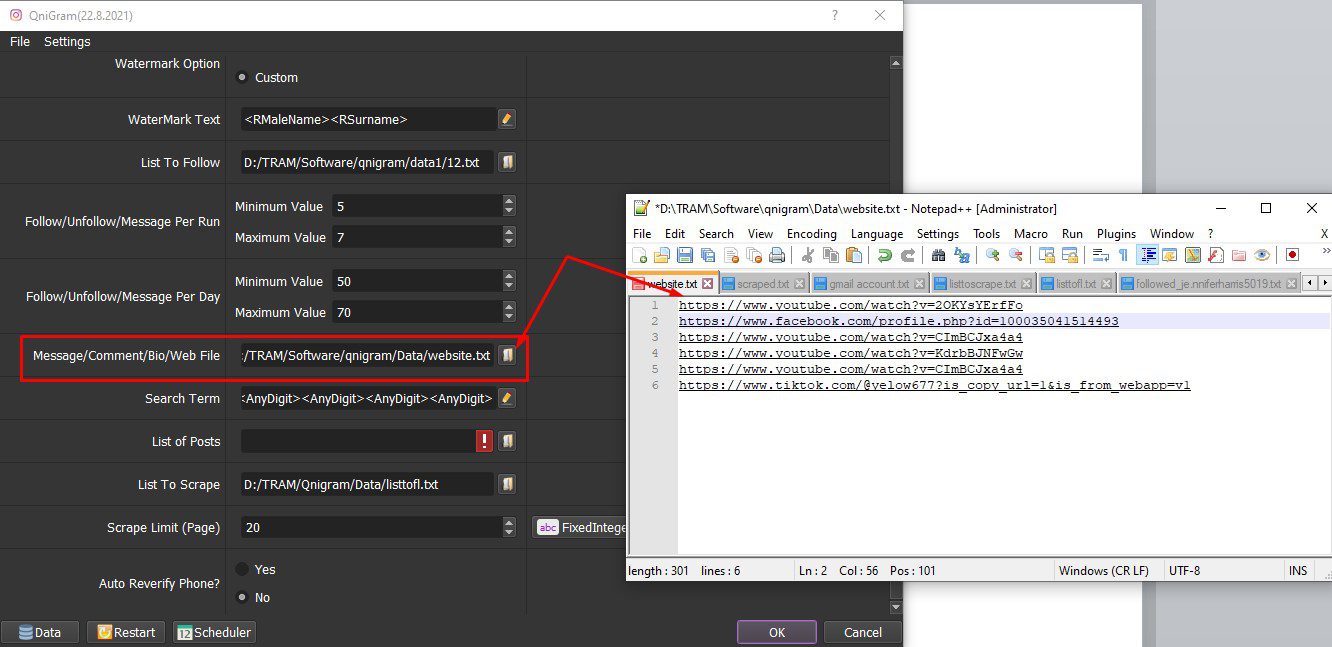
D5. Update Website

You choose this function to update the website for Instagram accounts,
You can leave the link to Youtube channel, Facebook, Tiktok, etc. as you want.

In the Action section, select Update Website.

In the Message/Comment/Bio/Website File section, click  ==> select the file containing the website links that you want to update to your Instagram accounts ==> Click OK to run.

Chức năng cập nhật website cho các tài khoản Instagram - Phần mềm Qnigram - Phần mềm Instagram

D6. Upload Photo

Upload Photo is an automatic photo posting function on Instagram.
Similar to the Update Avatar function, you also need to create a folder to store the images. When running the Upload Photo function, the software will upload random images to Instagram from this image folder.

In the Action section, select Upload Photo. Next, select the Image Folder item ==> click , select  Image Folder ==> click “OK” to run.

Chức năng Upload Photo - Phần mềm Qnigram - Phần mềm Instagram

D7. Upload Photo Watermark

Upload Photo Watermark is a function for posting images with watermark.
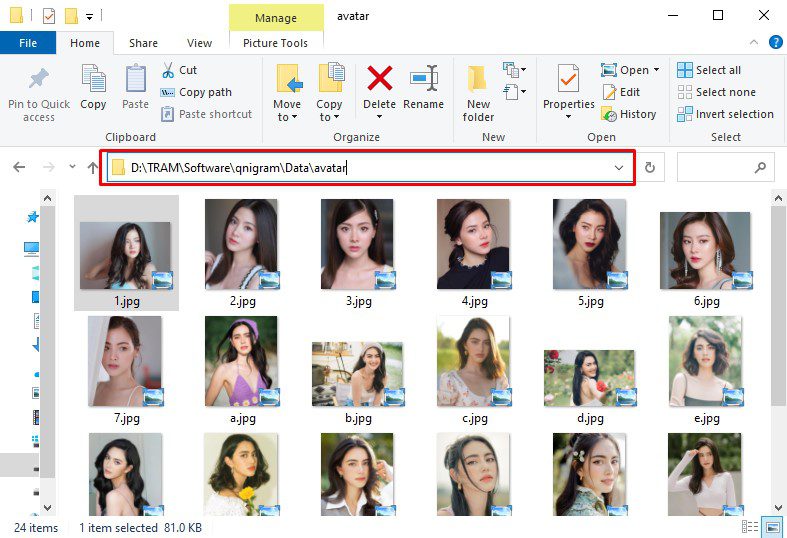
First, In the Action section, select Upload Photo Watermark, create a folder to save the images that you want to upload.

Thư mục lưu hình ảnh - Phần mềm tự động Instagram

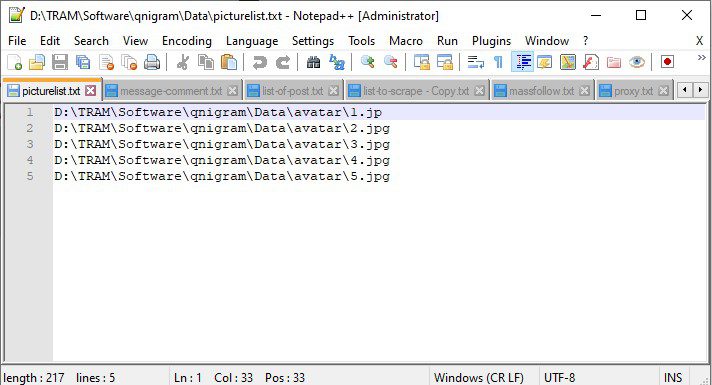
Next, you create a text file to save the path + name the image. For example: As picture above, the text file content has the form: D:\TRAM\Software\qnigram\Data\avatar\1.jpg

The file looks like the image below and each line will be an image.

File để lưu tên hình ảnh - Phần mềm tự động Instagram

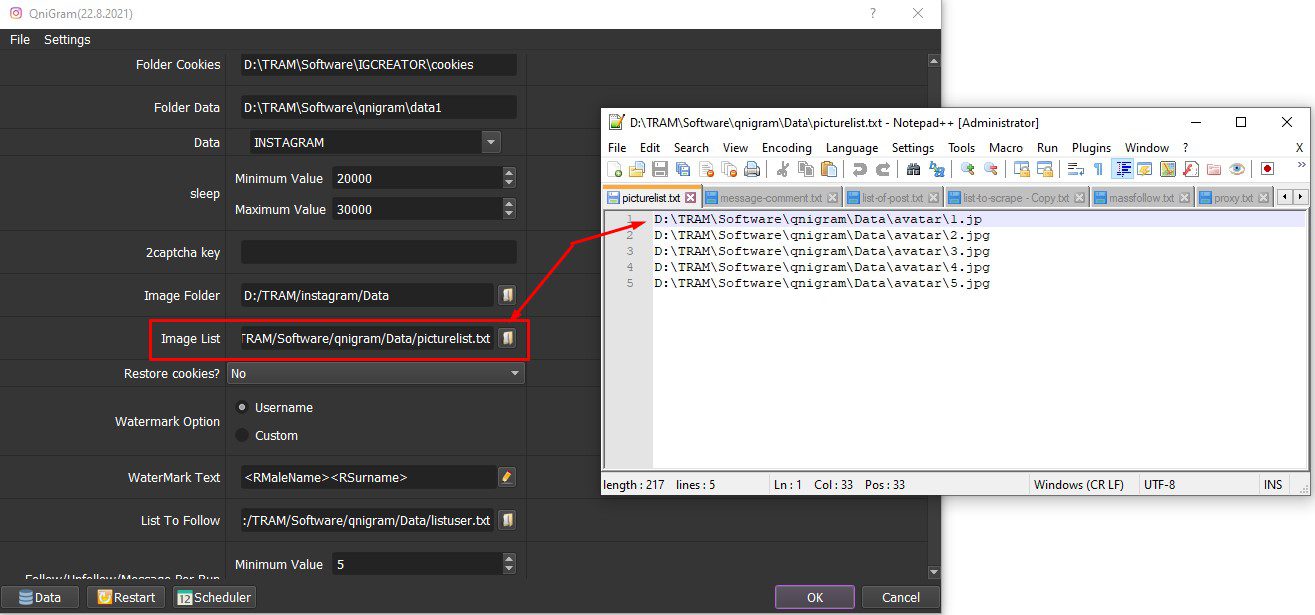
In Image List section, click  ==> select file to save picture that you have just created.

Chọn file lưu tên hình ảnh - Phần mềm tự động Instagram

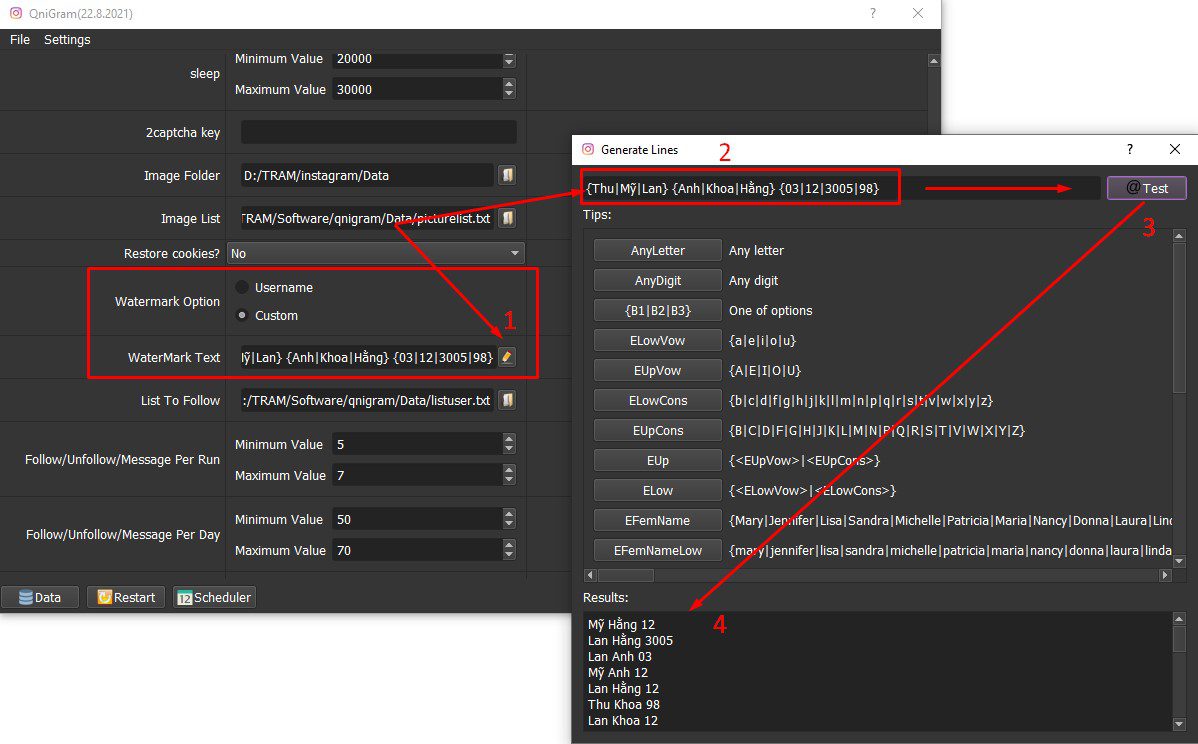
In Watermark Option section, you have two ways to watermark the images.

  • Username: the watermark on the photo will be the username of that account.
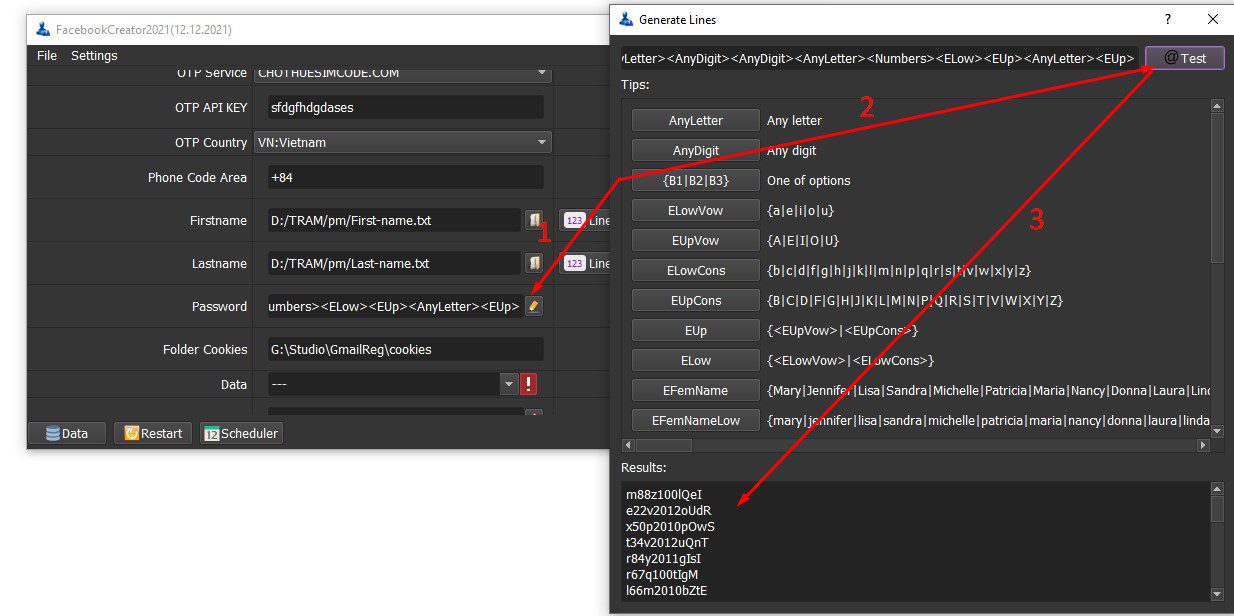
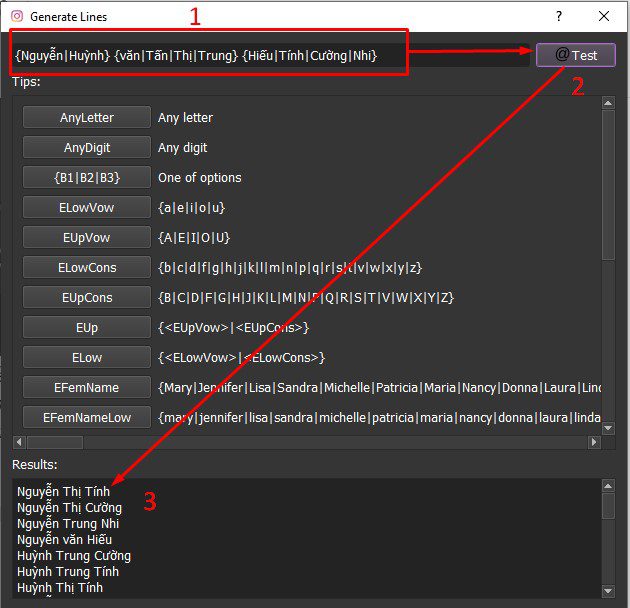
  • Custom: Define the custom watermark text by clicking sửa-1.png (22×30)  and type the content, you can use Spintax format or predefined Tips ==> press @Test  to preview==> Click Ok to run (as picture below).

Đăng hình có chữ ký ảnh - Phần mềm tự động Instagram

D8. Scrape Users

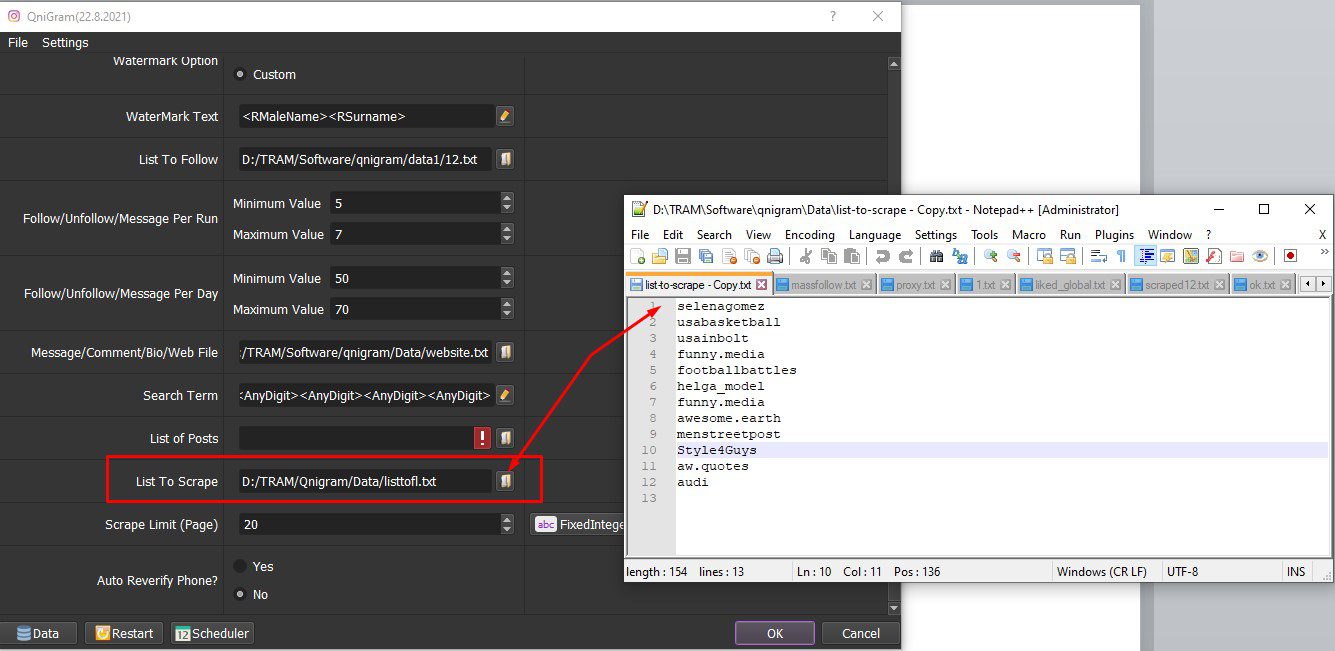
Scrape Users is a function to scrape users who are following other accounts.  In the Action section, select Scrape User. In List To Scrape ==> click   ==> select the file that store usernames of the accounts that you want to scrape followers ==> Click OK to run.

Chức năng quét người dùng - Phần mềm Qnigram - Phần mềm Instagram

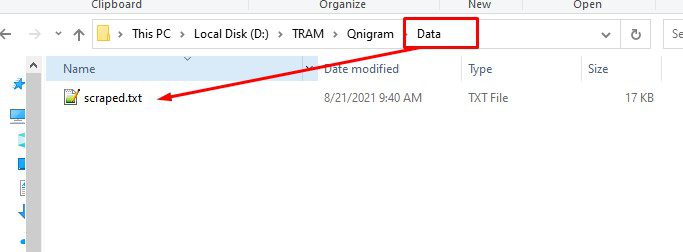
The results will be saved in the Data folder with the name Scraped (you created according to the instructions created in section 7 part I).

Kết quả chạy được của phần mềm Qnigram - Phần mềm Instagram

D9. Follow Users

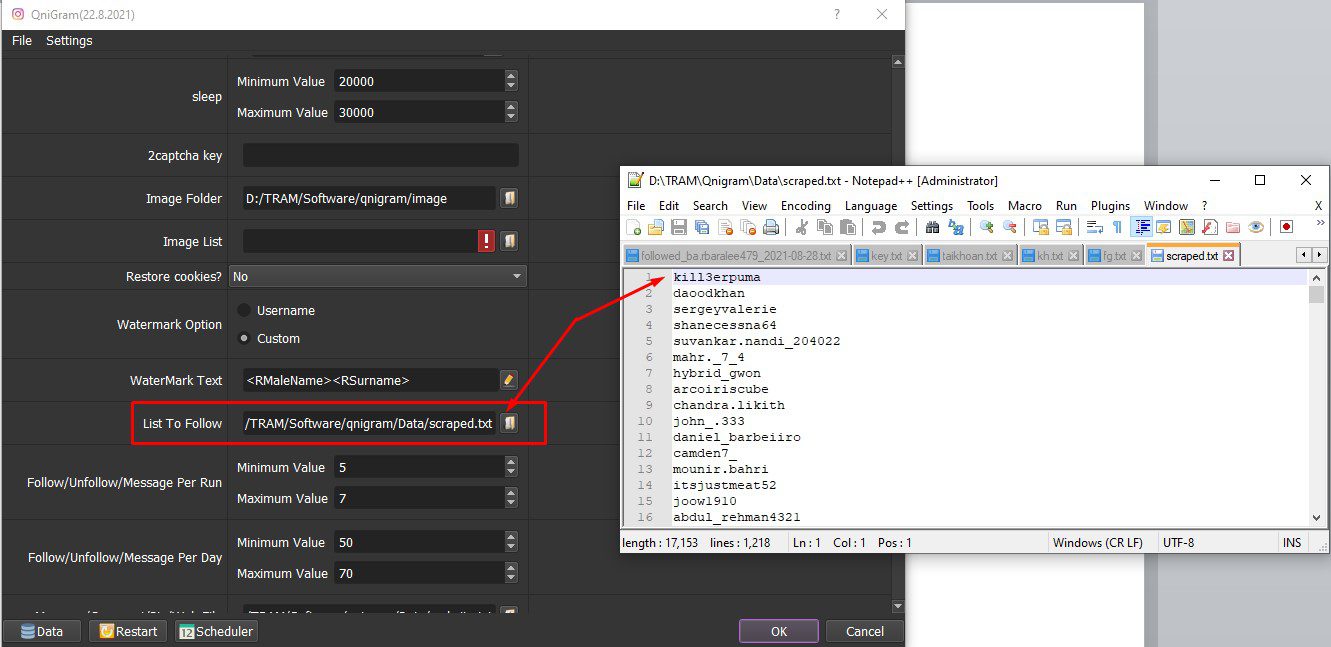
Your Instagram accounts will follow many other users according to the available list. To get this list of users, you run the Scrape Users function (refer to section 8 part D), or you can create another file to store the usernames that you want to follow.

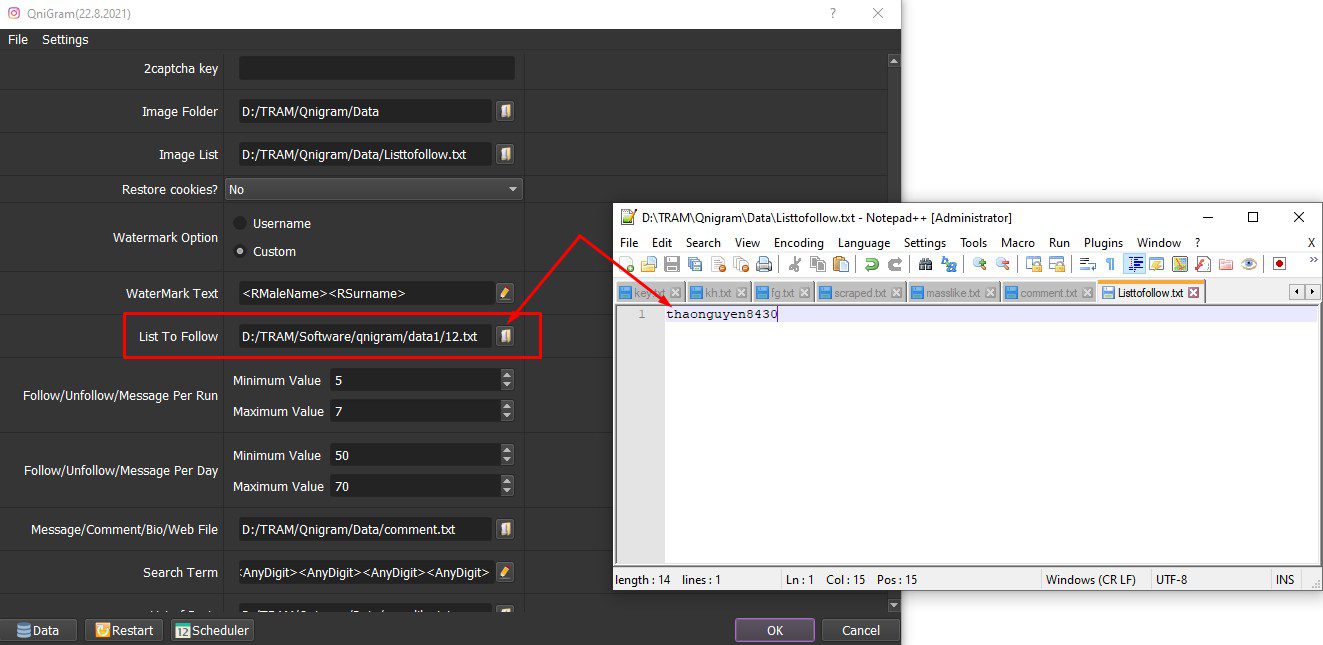
In the Action section, select the Follow Users function. In the List to Follow section ==> select the file containing the users ==> Click OK to run.

Chức năng Follow Users

Set up how many people follow each account and how many people follow each day (refer to section 20, part D).

D10. Search & Follow

This function is used to find and follow users. In the Action section, select Search & Follow:

  • Click OK to automatically search and follow accounts by default of the software.
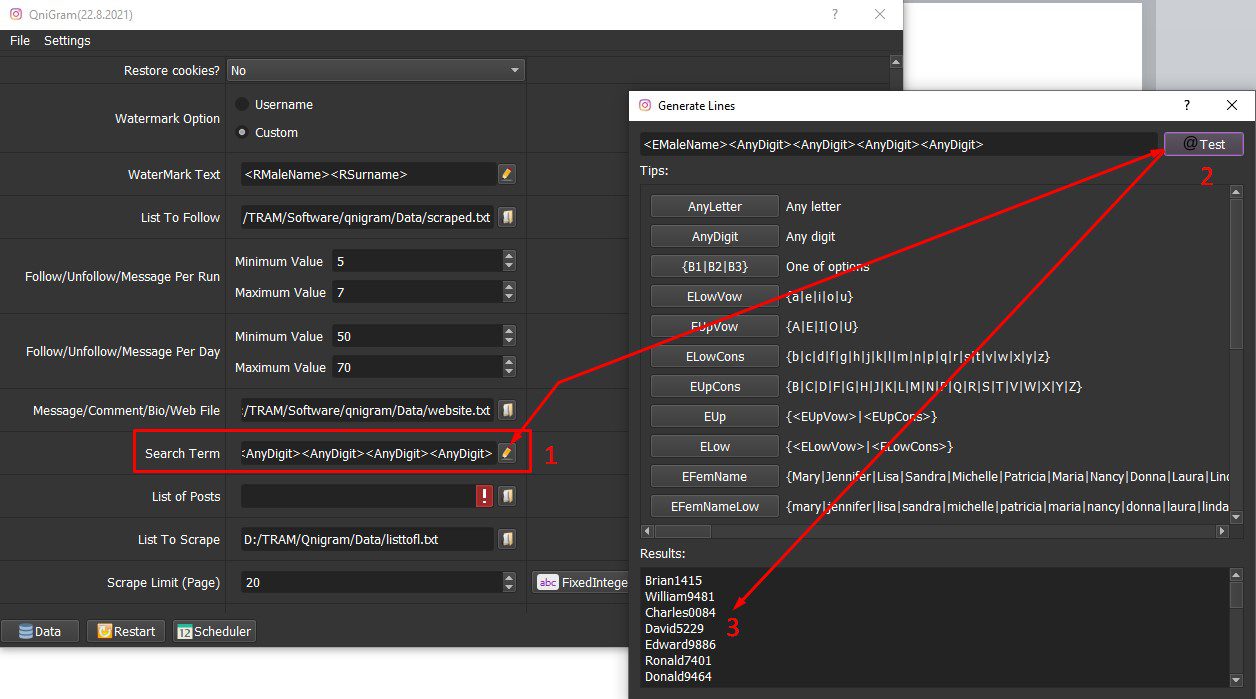
    In the Search Term section, click sửa-1.png (22×30) ==> click @Test, you will see the pre-set usernames.

Chức năng Search & Follow - Phần mềm Instagram

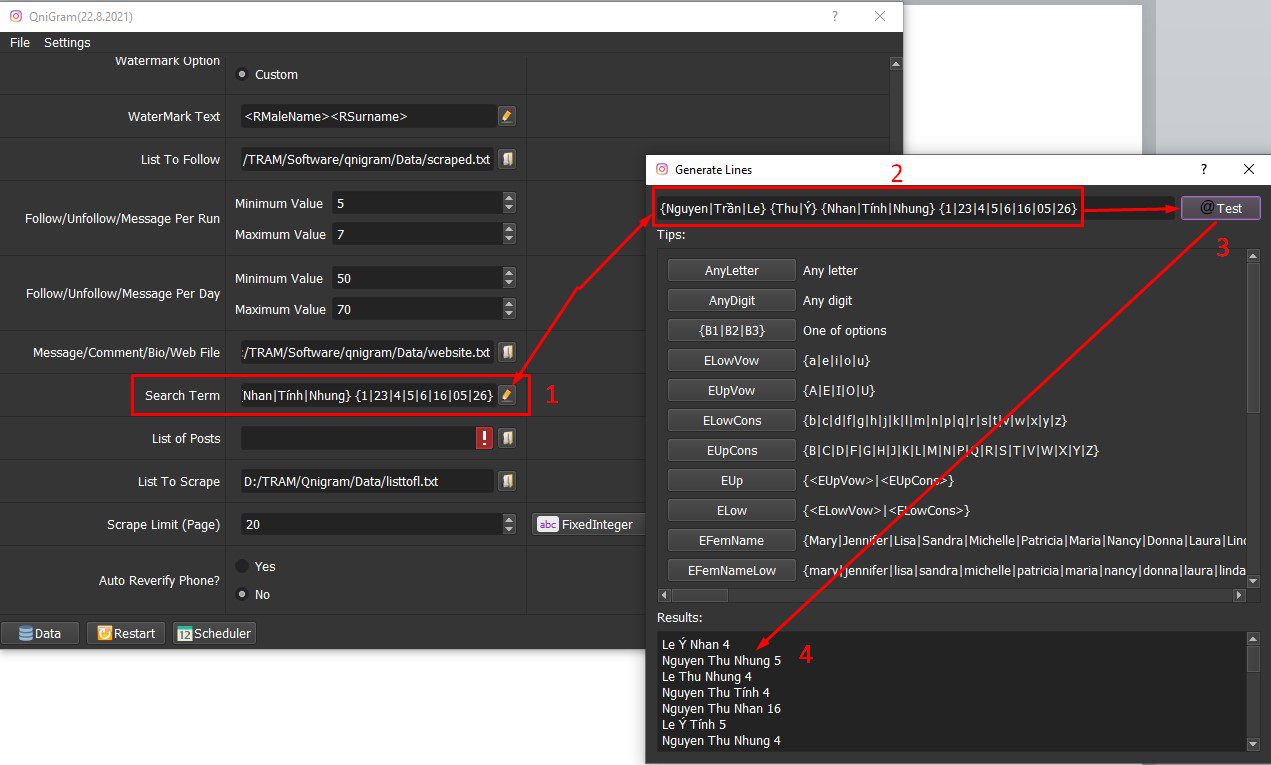
If you want the software to search and follow specified users, in the Search Term section, click  sửa-1.png (22×30)  ==> Enter the usernames as shown below ==> click @Test ==> click OK to run.

Tìm kiếm và follow người dùng

D11. Mass Follow

Mass Follow is used to increase followers for Instagram accounts.

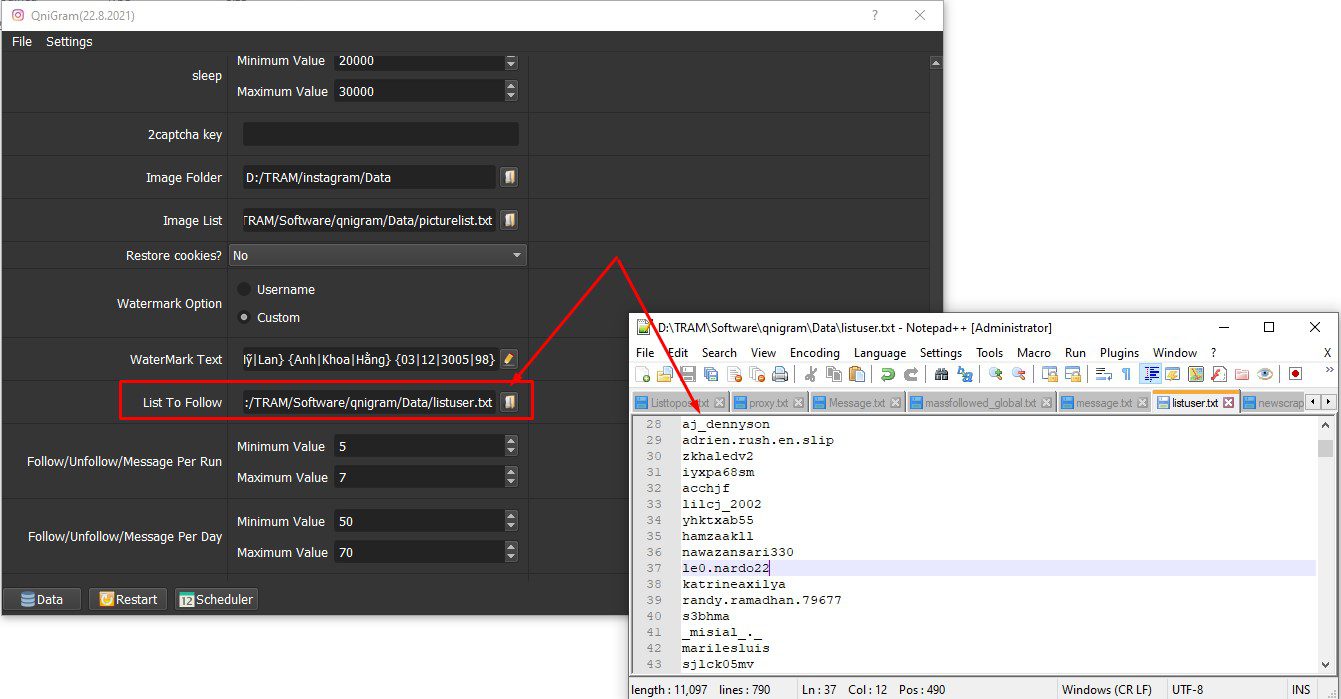
In the Action section, select Mass Follow. In the List to Follow section, click  ==> select the file containing usernames that you want to increase followers ==> Click OK to run.

Chức năng mass follow - Phần mềm tự động Instagram

D12. Unfollow User

In Action section, select Unfollow User -> Click OK to run.

Chức năng Unfollow User của phần mềm tự động Instagram

You can read section 20, part D to set up accounts that be used to unfollow each day.

D13. Like User’s Photo

The software will auto like user’s new photo by this function.

In Action, choose Like User’s Photo.

In List to Follow, click  ==> select the file containing usernames that you want to like photo ==> click OK to run.

File lưu tên người dùng - Phần mềm tự động Instagram

D14. Search & Like

Similar to the Search & Follow function, the Search & Like function will automatically search and like the first post.

Select Search & Like in Action => click OK to run.

You can use Spintax format or select predefined Tips as shown in the following screenshot.

To see a list of pre-set users, go to Search Term, click sửa-1.png (22×30) ==> click @Test.

Chức năng Search & Follow - Phần mềm Instagram

Tìm kiếm và follow người dùng

D15. Mass Like

Select Mass Like in the Action section.

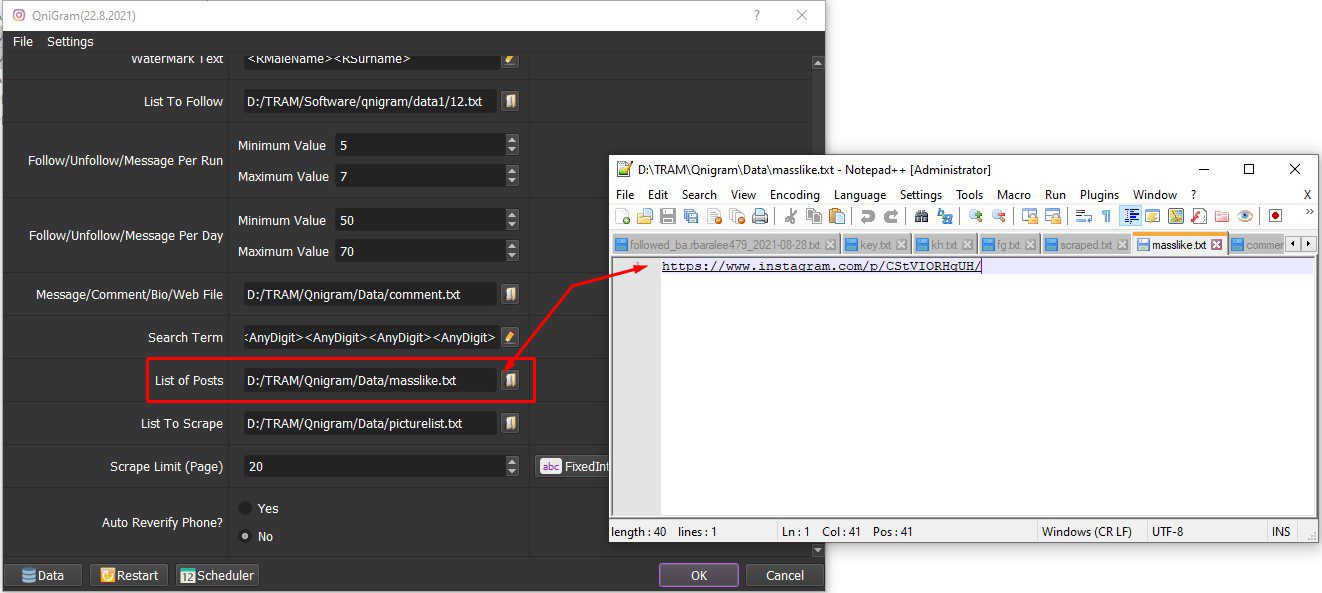
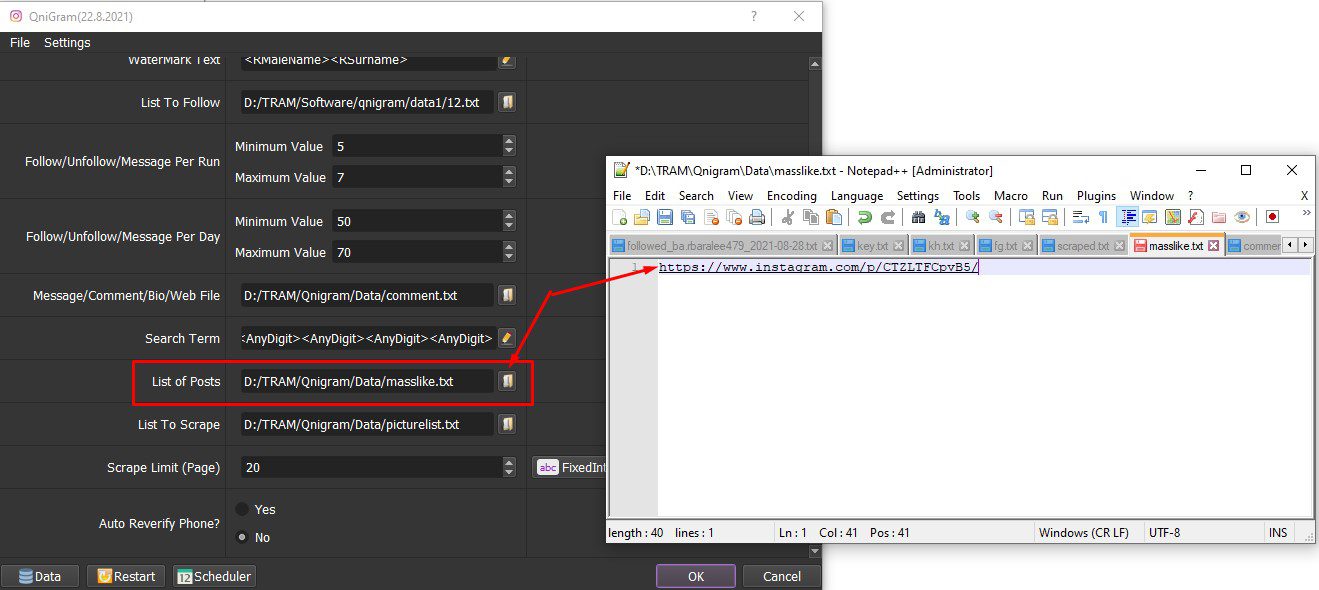
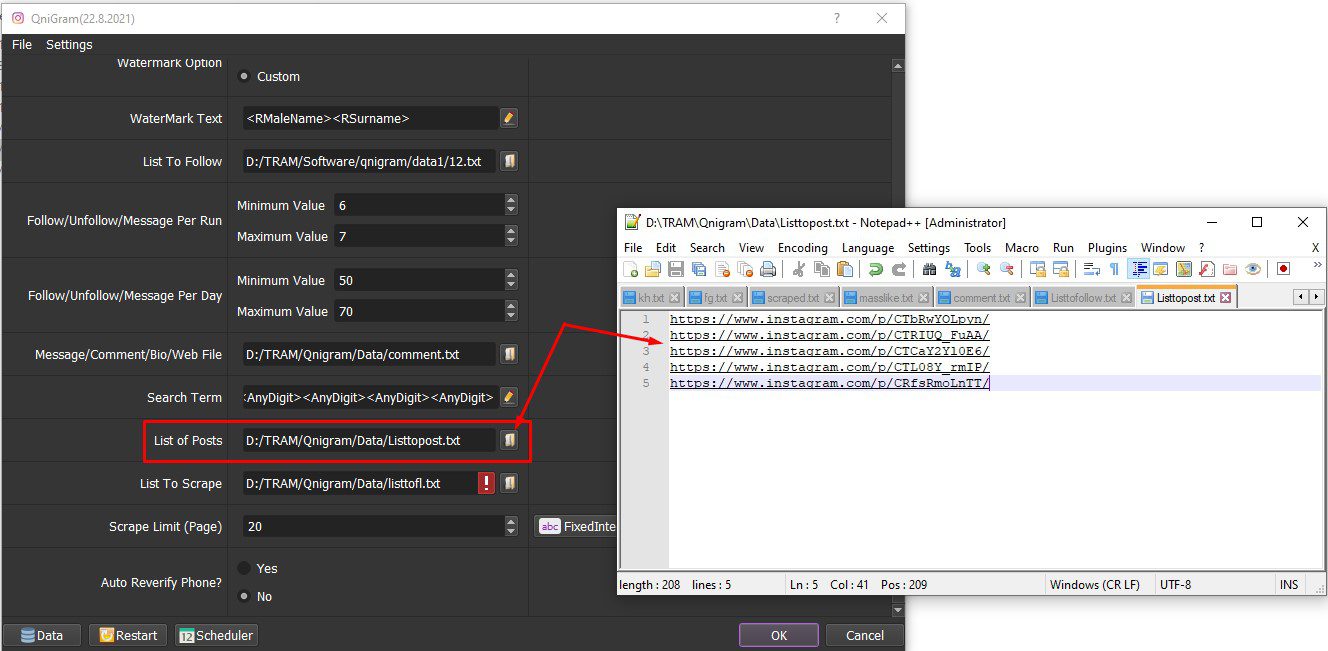
In the List of Post section, click  ==> select the file containing link of posts that you want to comment on ==> click OK to run.

Chức năng mass like - Phần mềm tự động Instagram

D16. Watch Video

To increase views of videos on Instagram, you run this function.

In Action, select Watch Video.

At List of Post ==> click  ==> select the file containing video links on Instagram that you want to increase views.

Chức năng tăng lượt xem video - Phần mềm tự động Instagram

You set up the time to watch video in the Sleep section.

Note: unit is millisecond (Ex: 20000 = 20 seconds).

Thời gian nghỉ giữa các luồng chạy - Phần mềm Qnigram - Phần mềm Instagram

Click OK to run.

D17. Comment User’s Photo

At Action section, select Comment User’s Photo.

In List to Follow, click  ==> select the text file containing users’ name that you want to comment on their photos.

File lưu tên người dùng - Phần mềm tự động Instagram

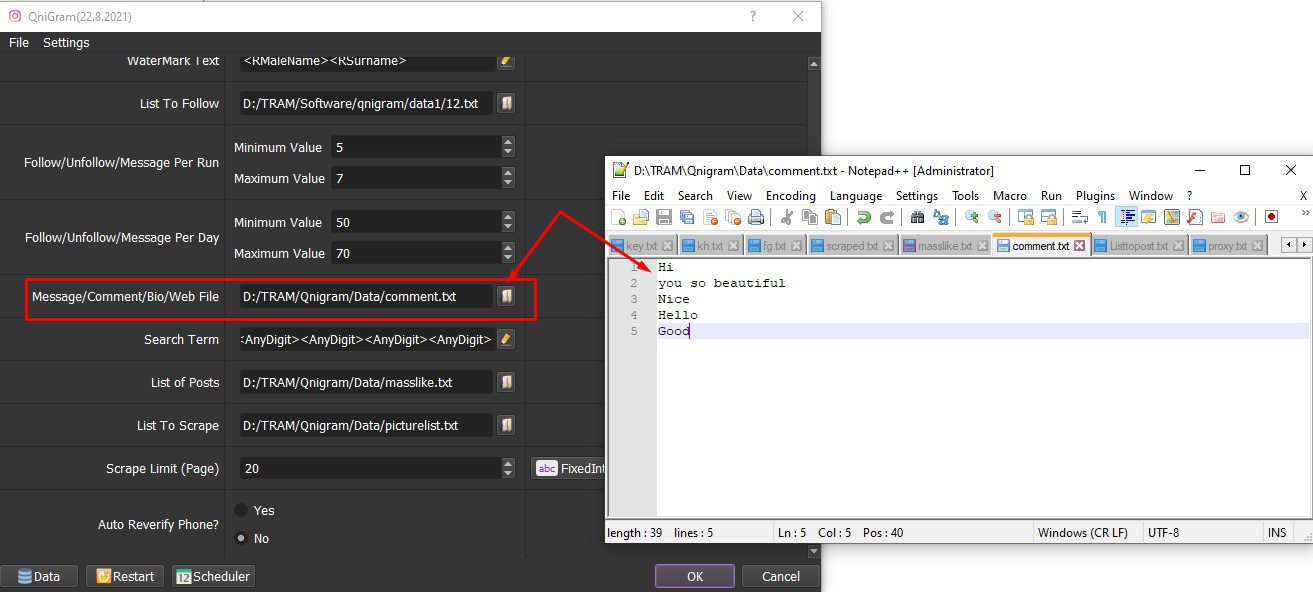
In Message/Comment/Bio/Web File, click  ==> select the text file containing content that you want to comment ==> Click OK to run.

Soạn nội dung mà bạn muốn bình luận để đưa vào mục này

D18. Mass Comment 

Mass Comment is used to increase comments of the post. At Action, select Mass Comment.

Note: Files are created in .txt format.

In Message/Comment/Bio/Web File, click  ==> select the text file containing content of comments.

At List of Post, select ==> select the file containing links of post that you want to comment==> Click OK to run.

Chức năng bình luận bài viết của người dùng - Phần mềm tự động Instagram

D19. Message User

This function is used to message to the users whose accounts followed.

In Action, select Message User.

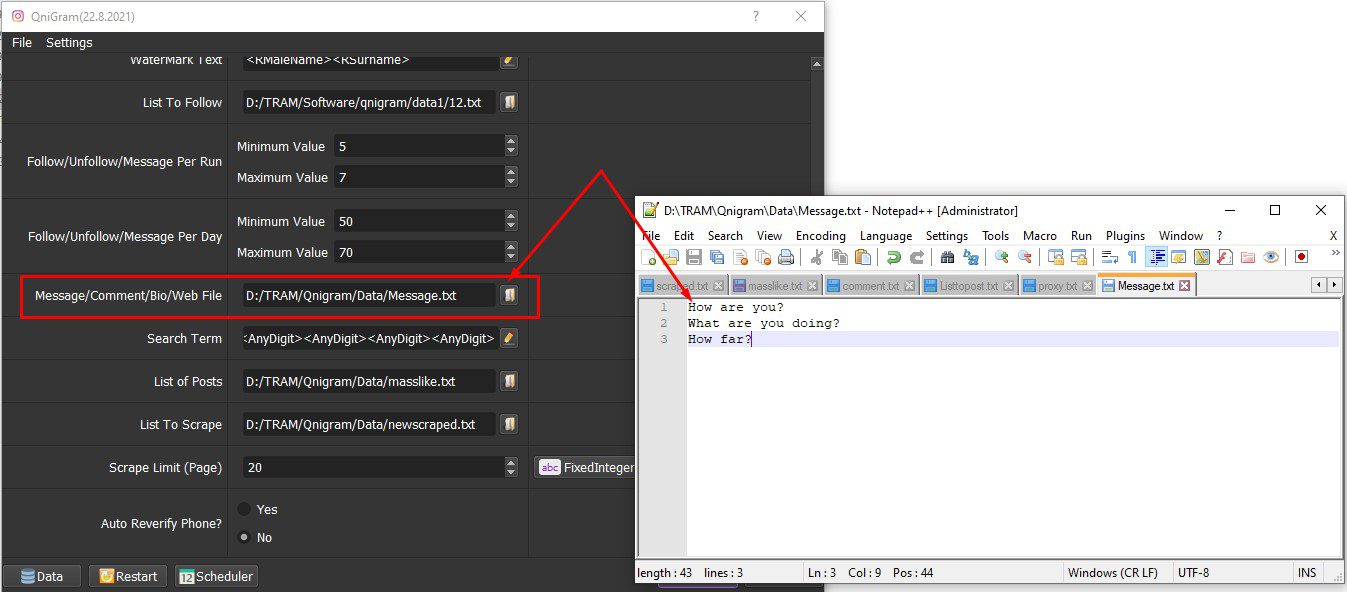
In the Message/Comment/Bio/Web File section, click  ==> select the text file containing the content you want to message.

Note: each line in the text file is a message, the software will randomly message.

Nội dung nhắn tin cho các người dùng - Phần mềm tự động Instagram

To set up how many messages per day, see Section 20, Part D.

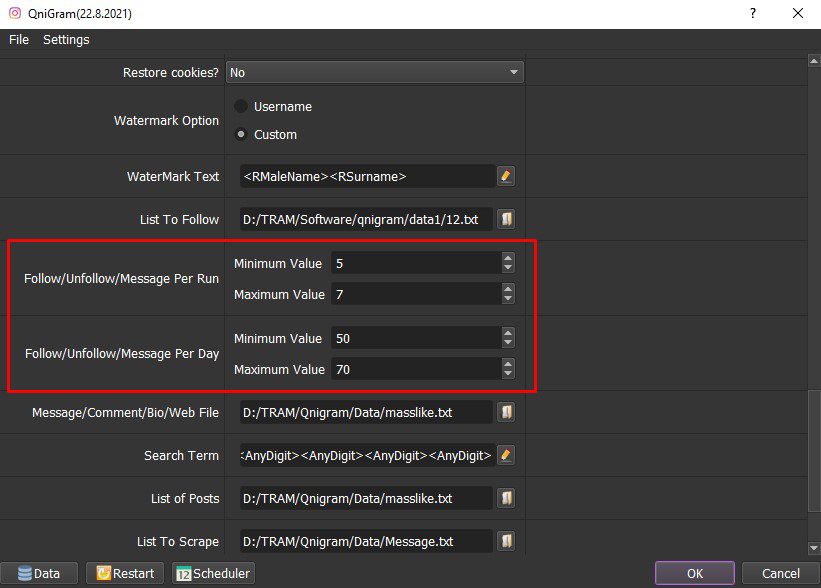
D20. Follow/Unfollow/Message PerRun and Follow/Unfollow/Message PerDay

Follow/Unfollow/Message PerRun/ PerDay is the number of followers/ unfollowers/ messages of each account per run/ per day.

Ex: Follow/Unfollow/Message Per Run is 5-7 and Follow/Unfollow/Message Per Day is 5-70. That means each account will follow/unfollow/message to 5-7 people each time, then switch to another account, and then run this account again until when enough the number of follow/unfollow/message per day is 50-70.

Thiết lập số người follow/unfollow/message - Phần mềm tự động Instagram

Tutorial Video

Contact info

Email: autobotsoft@gmail.com

FaceBook: https://www.facebook.com/autobotsoftsupport

Skype: live:.cid.78c51cd4e7238ae3

YouTube: https://www.youtube.com/channel/UCGftS8E3vX7IaUwg4GgDWDQ

Twitter: https://twitter.com/autobotsoft

Tutorial How To Create Suggested Keywords On Google and YouTube Using KeywordSuggestion Tool

This software can create suggested Keywords on Google Search and YouTube, SEO keywords on TOP Google/YouTube, provide you with the best way to help your website/video rank on top search results on Google and YouTube.

I. Main features of KeywordSuggestion Software

  • Create suggested keywords on Google
  • Create Suggested Keywords on YouTube
  • Keep Suggested keywords on Google and YouTube
  • Increase ranking for your websites and your YouTube videos
  • Auto login unlimited Google accounts before search on Google and YouTube
  • Increase web traffic and increase views on YouTube
  • Support proxy to change IP
  • Multi-threads
  • Emulate thousands of devices with different fingerings
  • Simulate human activities.

II. How to use KeywordSuggestion – Create Suggested Keywords on Google Search and Youtube

A. Login

When you buy KeywordSuggestion software, we will provide you with 3 links: software link, desktop useragent file and mobile useragent file. Download all these files and unzip the KeywordSuggestion.rar then run the .exe file to open the software.

Use the provided license username and password to fill in Login and Password.

Click OK to login.

B. Introduction of Each Functions – Create Suggested Keywords on Google Search and YouTube

Tính năng của phần mềm Tăng Từ Khóa Đề Xuất

B1. Suggest Google Keywords

When choosing this function, the software will make your keywords become suggested keywords of Google.

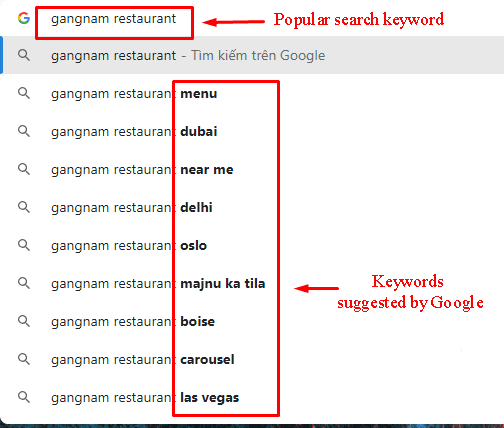
For example: if you search for “Gangnam Restaurant” (popular search keyword), you will find the keywords suggested by Google below. This software will help you create unlimited suggested keywords.

B2. Keep Google Suggest Keywords

When a suggested keyword doesn’t have clicks, it will be replaced by another keyword on Google search. This function will increase clicks on suggestions, keeping it on Google suggestions.

B3. Suggest YouTube Keywords

Similar to Suggest Google Keywords, this function helps in creating suggested keywords on YouTube.

B4. Keep YouTube Suggest Keywords

Similar to Keep Google Suggest Keywords, this function will keep the suggested keywords on YouTube.

C. How To Use KeywordSuggestion Software – Create suggested keywords

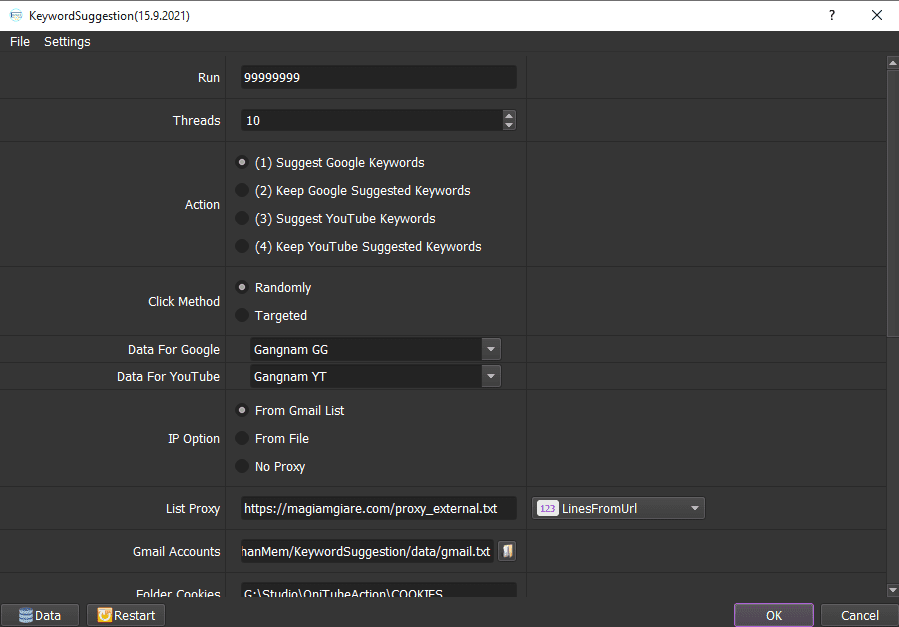
The following screenshot will show you all setting parameters as the create suggested keyword software:

Giao diện KeywordSuggestion - Tăng từ khóa đề xuất

C1. Run

This is the number of times that you want the software to run. You can leave it as the default.

C2. Threads

The number of threads is the number of tabs, accounts, or windows that run at the same time.

Each thread corresponds with a window that is opened. Provide number of threads that complies with your computer configuration.

C3. Action

Tutorial in section B.

C4. Click Method

Choose one of two methods to click on the webs, YouTube videos.

  • Randomly: randomly click on the search results without targeting a specific audience.
  • Targeted: click on the target (Website, Title, Phrase, etc.) in accordance with your settings. Learn more in Data for Google and Data for YouTube.

C5. Data For Google

KeywordSuggestion Tăng từ khóa đề xuất

The keywords, websites that you want to search and click on will be saved here.

C5.1 Add keywords, websites

>>Refer to HOW TO IMPORT DATA to add keywords, websites

Note

At Database Manager, click on Select table => Google Popular keywords

Link format don’t have https:// (delete “http://” in link of website).

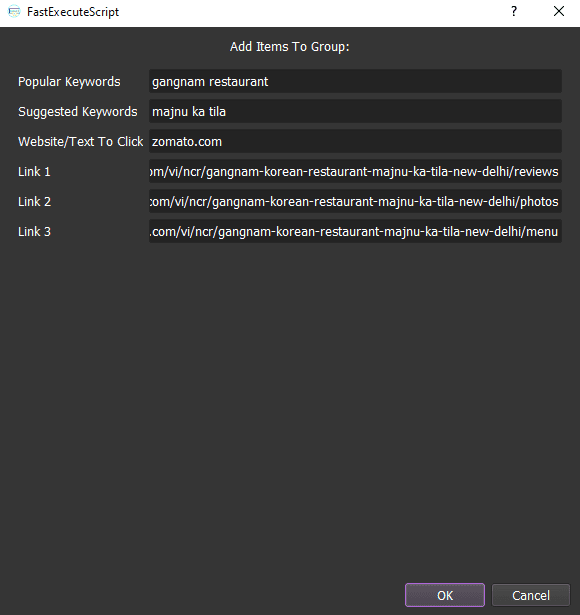
Enter the popular keyword that you want to search into Popular Keywords.

Enter the keywords that you want to suggest on Google into Suggestion Keywords.

If you choose Randomly in Section 4 (Click Method), don’t enter data for Website/Text To Click.
Otherwise, enter link of website that you want to click on the Website section.

Enter internal links taken from the website that you entered in Website/Text To Click into Link 1, Link 2, Link 3. The software will randomly click on these links to simulate the actions of real users. Refer to Template.


Finally, click OK.

Tăng từ khóa đề xuất bằng Tool KeywordSuggestion

C5.2 Delete and Edit
  • Edit

If you want to edit something in the FastExecuteScript dialog box, click on the group that you want to edit => Select   => At FastExecuteScript, edit the information => click OK.

  • Delete item

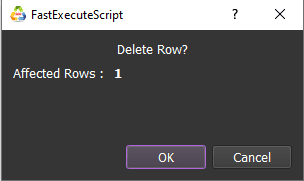
If you want to delete website information, click on that website => click  => Select OK, otherwise choose CANCEL to exit.

If there are many groups that you want to delete, click on them and select Delete Selected.

  • Delete group

The method is similar to deleting item.

Select  in group to delete.

Or click on the group that you want to delete and select Delete Selected.

C5.3 Select the group for the Data for Google item

Choose the group to SEO keywords.

C6. Data For Youtube

Enter the keywords that you want to search and suggest on YouTube here.

Click Data in the lower corner of the software.

KeywordSuggestion là phần mềm Tăng từ khóa đề xuất hiệu quả

The Database Manage dialog box displays => Click on Select table => YouTube Popular keywords.

Do the same as Data for Google section.

If you choose Randomly in Section 4 (Click Method), don’t enter data for Phrase To Click in Data.

C7. IP Option

To avoid being locked out of your Gmail accounts, you should use proxies.

Choose one of 3 options: From Gmail List, From File or No proxy.

Note: If you don’t have Proxy, choose No Proxy to run the software. Running so many Gmail accounts on the same IP can lead to your accounts locked.

C8. List Proxy

If you choose From File at IP Option, create a text file in which you will put the proxies one per line (for the LinesFromFile section), or paste the proxy address link (for LinesFromUrl section). Each proxy per line in format: IP:Port:Username:Password. Leave username and password empty if your proxy doesn’t have username and password (Some proxies work with IP authentication instead of using username and password).

cách tạo Từ Khóa Đề Xuất

Từ Khóa Đề Xuất Trên Google Search

C9. Gmail Account

If you choose From Gmail List at IP Option, create a text file (.txt) which contains gmail accounts.

Each proxy per line in format: Gmail,password,recovery Gmai,Proxy:Port“.

cách tạo đề xuất từ khóa cho google và youtube

At Gmail Account => Click  => select the text file containing Gmail accounts.

C10. Folder cookies

Folder Cookies is place where the software will store cookies and profiles of the accounts. Software will use cookies and profiles for the next runs without logging back into accounts. Create a new Cookies folder on any hardware disk that you want to save cookies and profiles and get the path to put into the setting as shown:

Phần mềm Keyword Suggestion

tăng từ khóa đề xuất Google Youtube

Phần mềm KeywordSuggestion

C11. Folder data

Do the same as Folder Cookies.

Tool tăng từ khóa đề xuất trên Youtube

C12. Useragent (Mobile)

Click on  ==> select the useragent files that were downloaded as mentioned in Section A.

C13. Internal Click

This is the number of clicks on the internal link according to Data for Google and Data for Click.

When users visit the Web/YouTube, they will randomly click on internal link of web/videos. The software integrates this feature to emulate actions of real users.

cách tăng từ khóa đề xuất bằng keywordsuggestion

C14. Pausing (Milliseconds)

Pausing is time waiting between two actions.

Note: Unit is millisecond (For example 30000 = 30 seconds).

C15. Will Rent Cookies?

If you rent Gmail at Autobotsoft, choose Yes. Otherwise, choose No.

phần mềm keywordsuggestion

C16. Rented Cookies File

If you rent Gmail at Autobotsoft (Choose Yes at Will Rent Cookies), click   => select the rented Gmail file.

KeywordSuggestion - Tăng từ khóa đề xuất

C17. End Page

Set up page number that Google searches end here.

C18. Default Google Url

Enter the default Google Url.

For example: if you want the Google Url in Korea, enter as shown.

phần mềm keywordsuggestion

C19. Default Youtube Url

Similar to section C18, enter Youtube Url here.

tăng từ khóa đề xuất trên Youtube

D. Run

Check all items, select OK to save and run each function of the software.

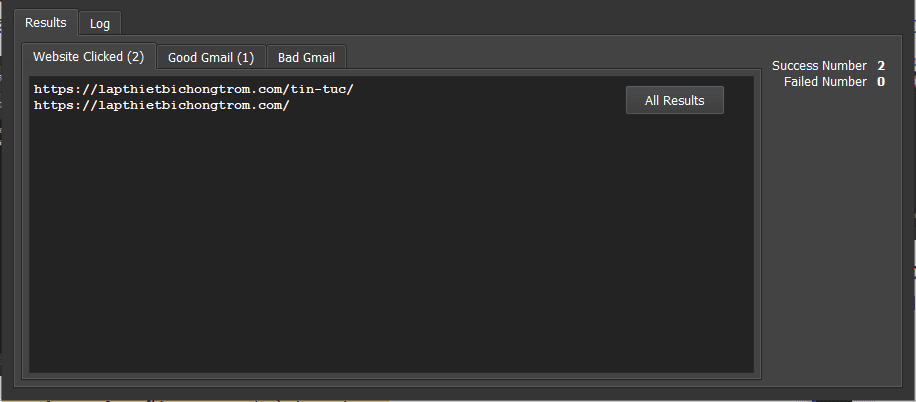
Note: All results will be displayed in the Results dialog box.


Contact info

Email: autobotsoft@gmail.com

FaceBook: https://www.facebook.com/autobotsoftsupport

Skype: live:.cid.78c51cd4e7238ae3

YouTube: https://www.youtube.com/channel/UCGftS8E3vX7IaUwg4GgDWDQ

Twitter: https://twitter.com/autobotsoft

SEO Tool – The best seo tools for beginners – SEO keywords – Increase Google Search traffic With QniSEOPro

QniSeoPro software is an effective SEO keywords tool which emulates different devices in various places to access your website in order to increase Google Search traffic. It interacts with the website like a real user by Searching for keywords on Google (the keywords you set up when installing) then finding your website to click on. As a result, your website will quickly increase its ranking on Google. 

Main features of QniSEOPro Bot – SEO keywords tool

  • Search Google for your keywords and find websites to click
  • Unlimited keywords and websites
  • Support D-com and proxy
  • Emulated thousands of different devices
  • Multi-threads
  • Simulation of Human activities
  • Random delays
  • Auto click internal pages after visiting your website from Google Search

How to use QniSEOPro/ SEO keywords tool to increase Google Search traffic?


1. Log in

When you buy QniSEOPro software, we will provide you with 3 links: software link, desktop useragent file and mobile useragent file. Download all these files and unzip the QniSEOPro.rar then run the .exe file to open the software.

Use the provided license username and password to fill in Login and Password.

Click OK to login.

The following screenshot will show you all setting parameters of the SEO keywords tool:

2. Run

This is the number of times that you want the software to run. You can leave it as the default.

3. Threads

The number of threads is the number of tabs, accounts, or windows that run at the same time.

Each thread will open a separate browser which has different fingering and IP.  Provide number of threads that complies with your computer configuration.

4. UserAgents:

Click on  ==> select the useragent files that were downloaded as mentioned in Section 1.

5. Proxy Option

To avoid being locked out of your Gmail accounts, you should use proxies.

Choose Dcom or Proxy.

6. Pause Between Internal Pages

Pause between actions (in milliseconds) when the software click on internal page.

7. Pause Between To Search

Do the same as Pause Between Internal Search.

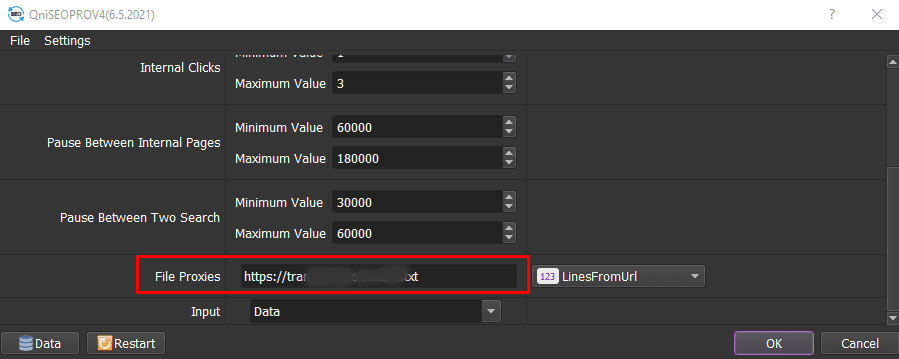
8. File proxies

There are 2 options for you:

  • Option 1: LinesFromFil

If you choose LinesFromFile, click  => select the text file which contains proxies.

Each proxy per line in format: IP:Port:Username:Password. Leave username and password empty if your proxy doesn’t have username and password (Some proxies work with IP authentication instead of using username and password).

  • Option 2: LinesFromUrl

If you choose LinesFromUrl, copy the proxy address link => paste it in “File proxies”.

9. Input

>>Input websites that need to increase views as steps mentioned in this link HOW TO IMPORT DATA

Note: Data imported includes: Website/Text To Click, Keywords, Link 1, Link 2, Link 3. Refer to data file here.

Finally, select the group that you want to increase website traffic at “Input“.

10. Internal Click

The software sets up this function to customize the time interval among clicks and interact with the website like a real user (Time is converted in seconds).

Depending on the number of internal clicks, you will install as many links in section 9.

Contact info

Email: autobotsoft@gmail.com

FaceBook: https://www.facebook.com/autobotsoftsupport

Skype: live:.cid.78c51cd4e7238ae3

YouTube: https://www.youtube.com/channel/UCGftS8E3vX7IaUwg4GgDWDQ

Twitter: https://twitter.com/autobotsoft

YTAUTOREPLIER SOFTWARE – AUTO REPLY COMMENTS – SEARCH AND SCRAPE COMMENT ON YOUTUBE

YTAutoReplier software will help users auto reply YouTube comments, collect YouTube video comments quickly, filter the Top comments or new comments of the videos automatically, etc. in order to save time in making your YouTube channel popular.


I. Outstanding functions of YTAutoReplier Bot – Auto reply YouTube comments

  • Auto reply YouTube comments
  • Auto scrape comment on YouTube
  • Filter comment
  • Auto search comments by tags
  • Support Proxy to change IP
  • Multi-threads

II. How to download YTAutoReplier Bot – Auto reply YouTube comments?

When you buy YTAutoReplier software, we will provide you with 3 links: software link, desktop useragent file and mobile useragent file. Download all these files and unzip the YTAutoReplier.rar then run the .exe file to open the software.

Use the provided license username and password to fill in Login and Password.

Click OK to login.

You choose one of two ways:

  • Run now: Run the software instantly
  • Schedule: Schedule the application to run at specific time
tool tăng thứ hạng bình luận youtube

Learn more: How to use Schedule Tool.

III. Introduction Of Each Function to auto reply YouTube comments

1. Run

This is the number of times that you want the software to run. You can leave it as the default.

2. Threads

The number of threads is the number of tabs, accounts, or windows that run at the same time.

Each thread corresponds with a window that is opened. Provide number of threads that complies with your computer configuration.

3. Action

Select a function on which you want to run the software.

  • Scrape Comment links
  • Reply to Comment

4. Gmail

>>REFER TO HOW TO IMPORT DATA 

Note: The data imported includes Gmailpasswordrecovery emailproxyport. You import data as the Template.

Then, click OK to save.

At Gmail section, select the group of data that you want to use.

5. User-Agent Desktop

Click on  ==> select the useragent files that were downloaded as mentioned in Section II.

6. Proxy Source

To avoid being locked out of your YouTube accounts, you should use proxies.

  • If you choose From File, create a text file in which you will put the proxies (for the LinesFromFile section), or paste the proxy address link (for LinesFromUrl section). Each proxy per line in format: IP:Port:Username:Password. Leave username and password empty if your proxy doesn’t have username and password (Some proxies work with IP authentication instead of using username and password).
  • If you choose From Data, click Data in the lower left corner of the software. The account management panel will display (Refer to section 4 of part III to know how to import the Proxy into the software).
  • If you don’t have Proxy, choose No Proxy to run the software. Running so many YouTube accounts on the same IP can lead to your accounts locked.

7. Folder Cookies

Folder Cookies is a place where the software will store cookies and profiles of the accounts. Software will use cookies and profiles for the next runs without logging back into accounts. Create a new Cookies folder on any hardware disk that you want to save cookies and profile and get the path to put into the setting as shown:

8. Folder Data

Do the same as Folder Cookies.

9. Random Delay

Random Delay is time waiting between two actions.

Note: Unit is millisecond (For example 30000 = 30 seconds).

10. Rent Cookies?

If you rent cookies at Autobotsoft.com, choose Yes => At File Rented Cookies, Click   => select file that Autobotsoft provided.

Otherwise, choose No.

IV. How To Run Each Function of YTAutoReplier Bot – Auto reply YouTube comments?

1. Scrape Comment Links

At Action, choose Scarpe Comment Links.

Create a text file which contains tags.

At Tag, click Phần mềm Tiktok => select the text file that contains tags.

At Search Filter, choose filter to search on YouTube.

In Soft Comments By section, choose one of two ways to scrape comments.

At Number Of Comments/Video, choose the number of comments/video.

Note: comments scraped will be saved in Not in group of Database Manager. You use this data to run Reply to comment function.

2. Reply To Comment

At Action, choose Reply To Comment.

Create a text file which contains comments that you will use to comment on YouTube.

At Reply Content, click Phần mềm Tiktok => select the text file containing comments:

At Link to Reply, choose group that contains links of comments.

Click OK to run.

Thanks for reading!

Contact info

Email: autobotsoft@gmail.com

FaceBook: https://www.facebook.com/autobotsoftsupport

Skype: live:.cid.78c51cd4e7238ae3

YouTube: https://www.youtube.com/channel/UCGftS8E3vX7IaUwg4GgDWDQ

Twitter: https://twitter.com/autobotsoft

How To Use WebTraffic Tool – Increase Website traffic – SEO Web To TOP On Google Search

Main features of Increase Website traffic Bot

How to use WebTraffic Bot?

A. Login

When you buy WebTraffic software – Increase Website traffic, we will provide you with 3 links: software link, desktop useragent file and mobile useragent file. Download all these files and unzip the WebTraffic.rar then run the .exe file to open the software.

Hướng Dẫn Sử Dụng Phần Mềm Tăng Truy Cập Website

B. Detailed settings of WebTraffic Bot

B1. Sleep Time

Sleep is time waiting between two actions.

Note: Unit is millisecond (For example, 30000 = 30 seconds).

B2. Run:

This is the number of times that you want the software to run. You can leave it as the default.

B3. Threads

The number of threads is the number of tabs, accounts, or windows that run at the same time.

Each thread will open a separate browser which has different fingering and IP. Provide number of threads that complies with your computer configuration.

B4. UserAgents (Desktop)

Click on  ==> select the useragent files that were downloaded as mentioned in Section A.

B5. IP Option

To avoid being locked out of your Gmail accounts, you should use proxies.

Choose Dcom or proxylist.

B6. File Proxy

If you choose Proxy in IP Option, create a text file which contains proxies. Otherwise, if you choose to use Dcom, skip this step.

Note: Each proxy per line in format: IP:Port:Username:Password. Leave username and password empty if your proxy doesn’t have username and password (Some proxies work with IP authentication instead of using username and password).
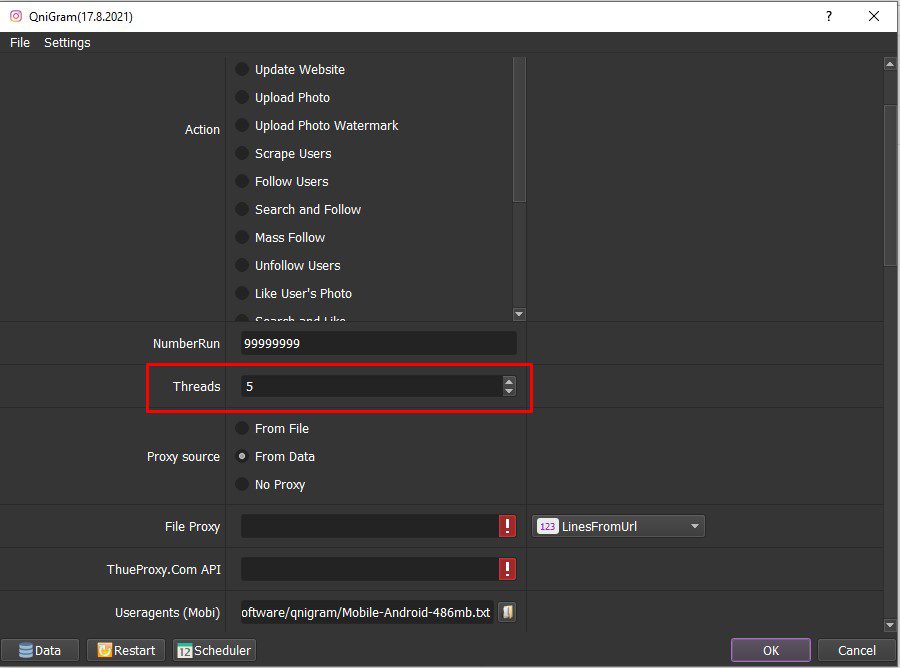
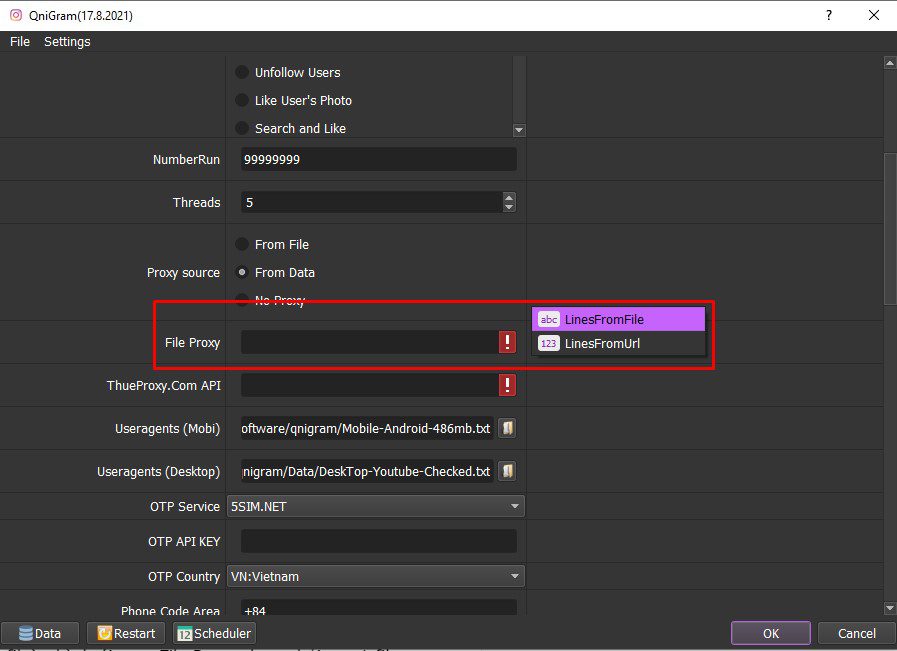
If you want to rent proxy, click HERE.

B7. Search Input

Set up the DATA section for the software to simulate users’ searches.

C. Results

Click OK to run.

Click Show browser to see the running process of the Increase Website traffic software.

All software activities are listed in the Log section. You can see how the software is running.

Contact info

Email: autobotsoft@gmail.com

FaceBook: https://www.facebook.com/autobotsoftsupport

Skype: live:.cid.78c51cd4e7238ae3

YouTube: https://www.youtube.com/channel/UCGftS8E3vX7IaUwg4GgDWDQ

Twitter: https://twitter.com/autobotsoft